If you have ever felt stuck in a rut with your footage – it falls a little flat, the colors are difficult to edit in post, the blacks are a bit grainy, or it just doesn’t feel as beautiful and airy as you want it to, then read on.
Today we are talking about arguably one of the most important concepts to master in order to take beautiful, cinematic, film-like videos (or photos for that matter) – LIGHTING.
Master Indoor Lighting And Make Your Videos Dramatically Better
I used to be super intimidated about lighting for video. To me, lighting meant complicated, expensive, heavy equipment in a studio. It meant hours of tweaking and shifting to get it juuuust right. Change one thing and you’ve got to change it all again. I mean, some people love that kind of thing (you know who you are) but it’s never been my thing.
Flash forward 3 years, and honestly mostly due to what I’ve learned by shooting more still photography, I started to realize that lighting is actually not that hard. Important? Yes. Hard? Nope!
And honestly, the absolute BEST light source out there is completely free – you guessed it, the sun. And I’m not simply referring to shooting outside, I’m talking about window light.
Arguably, window light can be even better than outdoor light. The window naturally diffuses the light, giving you a softer and less direct source to work with. This makes things worlds easier and is naturally more flattering to your subjects.
MASTERING WINDOW LIGHT
Let’s get into the specifics of how to make window light work for you. Because remember, having natural light is your foundation during shoots. And it can be your best friend once you know exactly how to work with it and not against it.


PRACTICE IN YOUR HOME
The thing about natural light is that it changes throughout the day as the sun rises and then falls on the other side of the globe.
In order to really get a feel for how to use indoor natural light, my best suggestion is to start studying the light in your own home. Or if you work in an office all day, study it there. Pick one or two windows and rooms and observe how the light changes from morning until evening.
There will be times when the sun is harsh and casts sharp angles with interesting shadows on the walls and then there will be times when the light is softer and indirect. Both extremes can be either helpful or challenging to your shots, depending on what you’re going for.
Here are a few examples that I’ve taken in my own home to illustrate. I’ll use still photos here, but you’ll get the same effect with video footage.
Both photos are taken in the same area of our home. The light is filtering in through the window on the left side.
First Image: it’s morning light. The sun rises on that side and comes in at a harsh angle through the blinds. As you can see, this can be an interesting affect when desired.
Second Image: the photo is taken in the afternoon. The sun is on the other side of the house now, so this light is indirect, casting less shadows on the child’s face and softening the light. It’s also reflecting off the white cushions and filling the shadows of her face nicely.


LIGHTING WITH JUST ONE WINDOW
I shoot a lot of newborn babies in hospital rooms for my fresh 48 films.
In these cases I’m relying on one (sometimes tiny) window to provide all of my light. And I’m not always in control of that light either – it may be cloudy or rainy, in some hospitals you can’t open the blinds completely, or it may be late in the day when the sun isn’t as bright.
All of these variables add up to make for one of the trickiest lighting situations. I’m going to walk you through how I handle these shoots.
First thing I do is turn off all the overhead lights. I know it seems counter intuitive and most of my clients look at me really funny. But here’s why…
NEVER MIX COLOR TEMPERATURES
99% of the time, indoor lights are incandescent bulbs. This means they have a color temperature close to 2700 Kelvin. The sun, on the other hand, has a color temperature of 5200 Kelvin. Those are drastically different temperatures.
In plain english, the lighting from the bulbs will look orange, while the lighting from the sun will look blue. When you mix these together, you have just made your footage nearly impossible to edit. What happens when you mix the light temperatures is that you can’t get rid of either hue without altering the other. It will especially affect the color of skin if you are filming people.
Even if it dramatically cuts down the amount of light, I recommend turning off all the overhead incandescent can lights and relying solely on the window light.
A few caveats: there are a few occasions where its been so incredibly dark that I do have to turn on the incandescent bulbs. In that case, you just do the best you can with your white balance. Try to nail it closely in camera and it will help make your job a bit easier in post production. Here’s a previous post where I talk in more detail about setting white balance.
FIND THE RIGHT POSITION
Once you’ve located a useable window source, you’ll need to physically move your subjects closer to the window. Depending on how you frame and position them, you’ll come out with a few different results.

- Natural and flattering : Position your subject at about a 45 degree angle to the window. This will frame and fill one side of their face with a soft and full amount of light.
- Direct and bright : Position your subject directly into the sun with your camera facing directly away from the sun. This will completely light your subjects face, which can be bright and flattering as well, especially against a darker background. It will make your subject pop against the background.
- Backlighting with lens flares : This is my favorite light technique and you can achieve it both indoors and outdoors. I will admit it’s the trickiest though and it will take some practice. With this type of lighting you are facing your camera directly into the sunlight while your subject faces you. You then use your subject to block the sun coming into your camera so that it just peaks around the edges of their head or body. It creates some really beautiful light when you master this technique.
- Silouhette Lighting : A classic technique. The positioning is very similar to backlight, but your exposure is very different. With backlighting, you expose for the subject’s face and many times the background is blown out. In the case of silouhette lighting, you expose for the borders or surrounding light and underexpose your subject so that they end up looking like a shadow or dark figure against the light.


A FEW EXTRA TRICKS
Here are a few other things that I do to add an extra light possible to the scene.
- Wear light colored shirts. Seriously, I do this. The reflection of a white shirt off your subjects face and eyes really does make a difference.
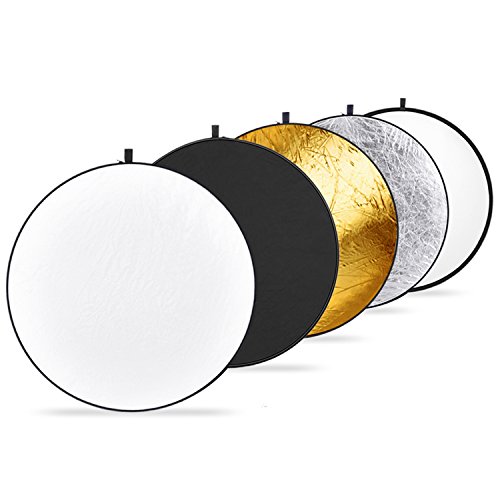
- Bring a piece of white foam board or a photo reflector. The cheap option is to buy white foam board from a local craft store and simply place it close to the subject (but out of frame) and use it as a reflector to bounce any excess sunlight onto the subject’s face. You can also buy a very inexpensive photo reflector (I recommend this one) if you want to keep things a bit more professional.
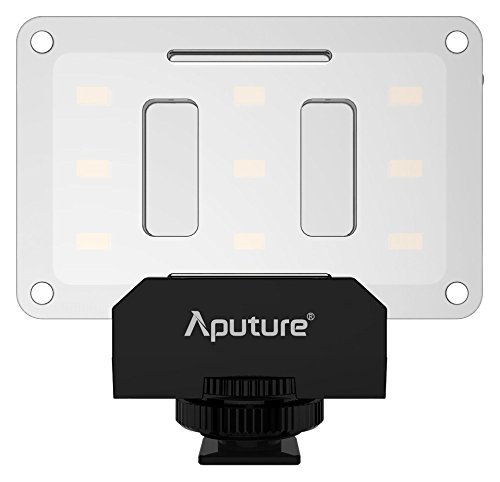
- Bring a small and portable fill light with you. There is no shame in bringing an extra light source. I pack a few of these handy ones for every shoot, just in case. They are inexpensive and super easy to use. Prop on a shelf nearby or have a family member hold it to the side for you (they always love to help!).
CONCLUDING THOUGHTS
I hope I’ve convinced you that lighting isn’t anything to be afraid of! But if you’re not there yet, the one thing you need to do is get out there and practice. And ask me questions!
Happy shooting!
-Beth
