In today’s post, I’ll walk you through exactly how easy it is to reconnect missing media files in Premiere Pro.
The dreaded missing media ‘red screen’ happens to the best of us, so don’t sweat it. Lucky for us, Premiere Pro has made it fairly quick and simple to reconnect multiple files at once so you can get back to editing in no time.
Understanding How Premiere Pro Works
Here’s a brief explanation for why you are getting the missing media notification in your project.
When you drag or import footage and other media files into your project panel within Premiere Pro, you need to know that the actual file itself hasn’t moved from its original location.
Premiere Pro simply creates a blueprint or a map of where that file lives and points back to the source of the file any time you use that file in your project.
For example, let’s say you’ve dragged in a file named ‘sunset’ from an external hard drive named ‘vacation videos’ that is located in a folder named ‘footage’.
The breakdown might look something like this:
Vacation Videos (External Hard Drive) -> Footage (Folder Name) -> Sunset (File Name)
This is where Premiere Pro will go to find this file anytime that you open your project.
However, if you move the file to a different folder OR if you rename and part of that equation (the hard drive, the folder, or the file itself) then Premiere Pro is going to be confused.
You changed the blueprint without letting Premiere Pro know.
This is why you’ll get the missing media link in your project.
If ever you move or rename a file, you have to redirect Premiere Pro to the new location of your file or files.
How to Relink Missing Media Files
First, think through what may have caused the broken link.
Did you move a folder or a file to a new location?
Did your hard drive get disconnected?
Did you rename any folders or files associated with your project?
If your hard drive was disconnected, you need to make sure that it is correctly connected before moving on to the next step.
Scenario 1: If you moved a folder or file to a new location.
Let’s walk through step by step the most common scenario – you moved a folder or file to a new location.

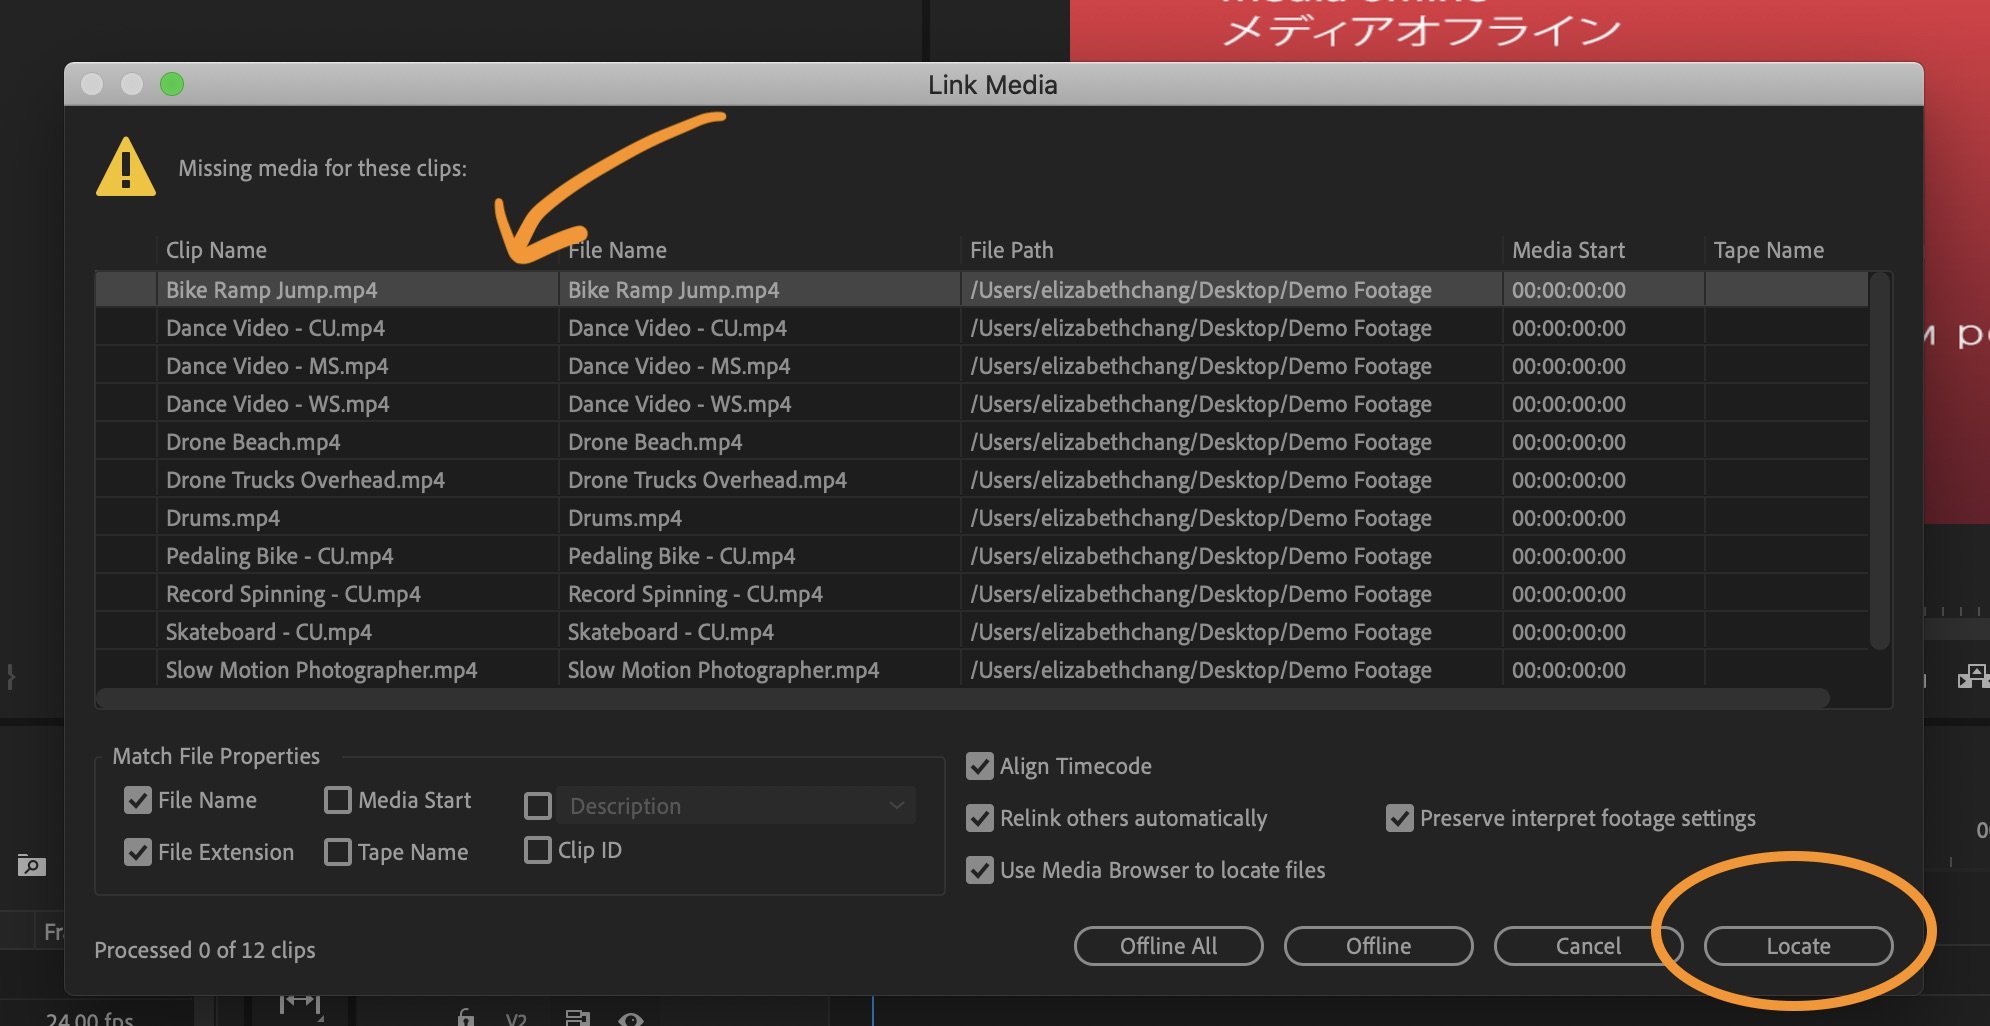
When you first open your project, you’ll see this ‘link media’ window pop open, letting you know exactly which files are missing.
If you don’t see this window, simply right click on a clip that is unlinked and choose ‘Link Media’.
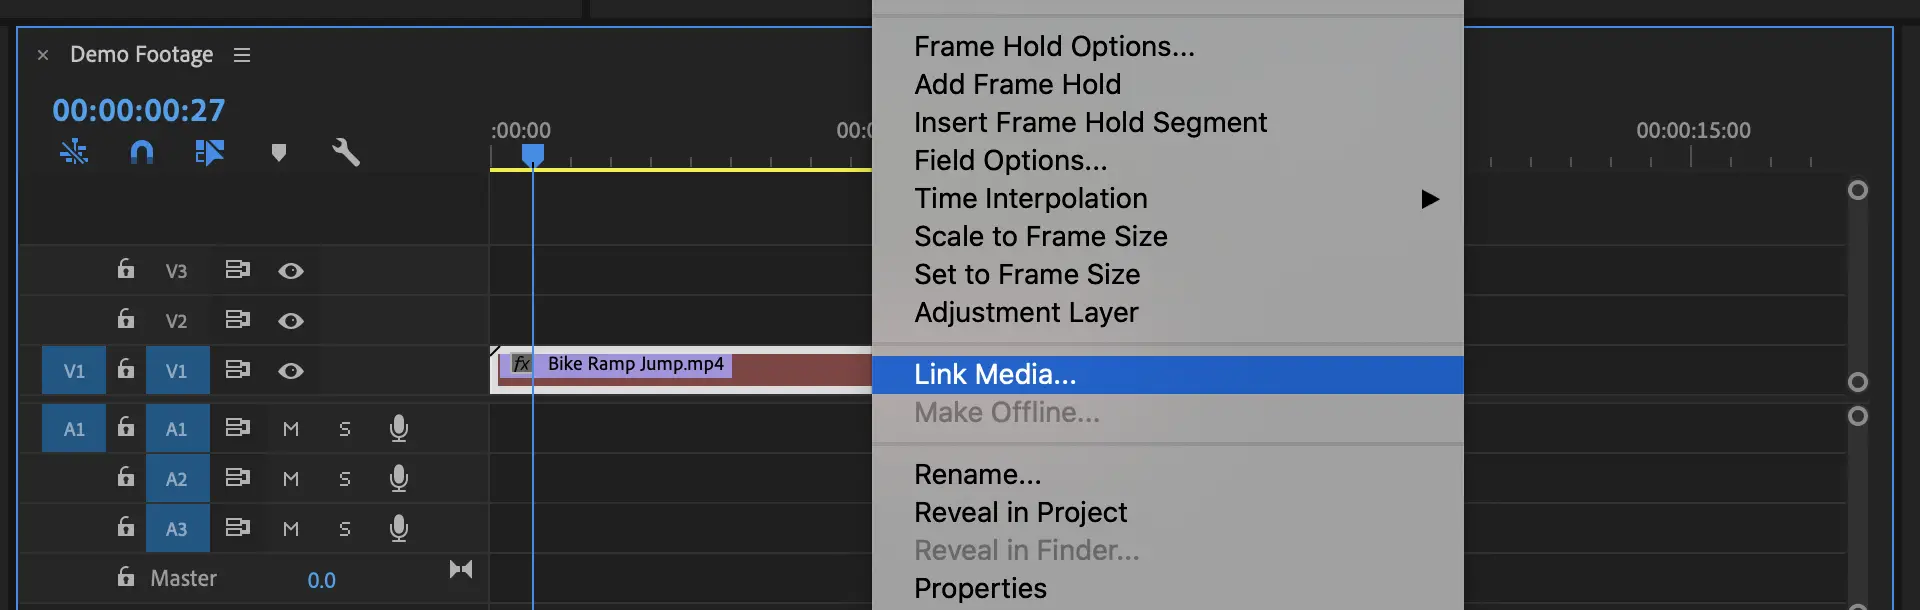
For this scenario, you can leave all the default settings at the bottom as is.

Select the top clip name and then hit the ‘Locate’ button in the bottom right corner.
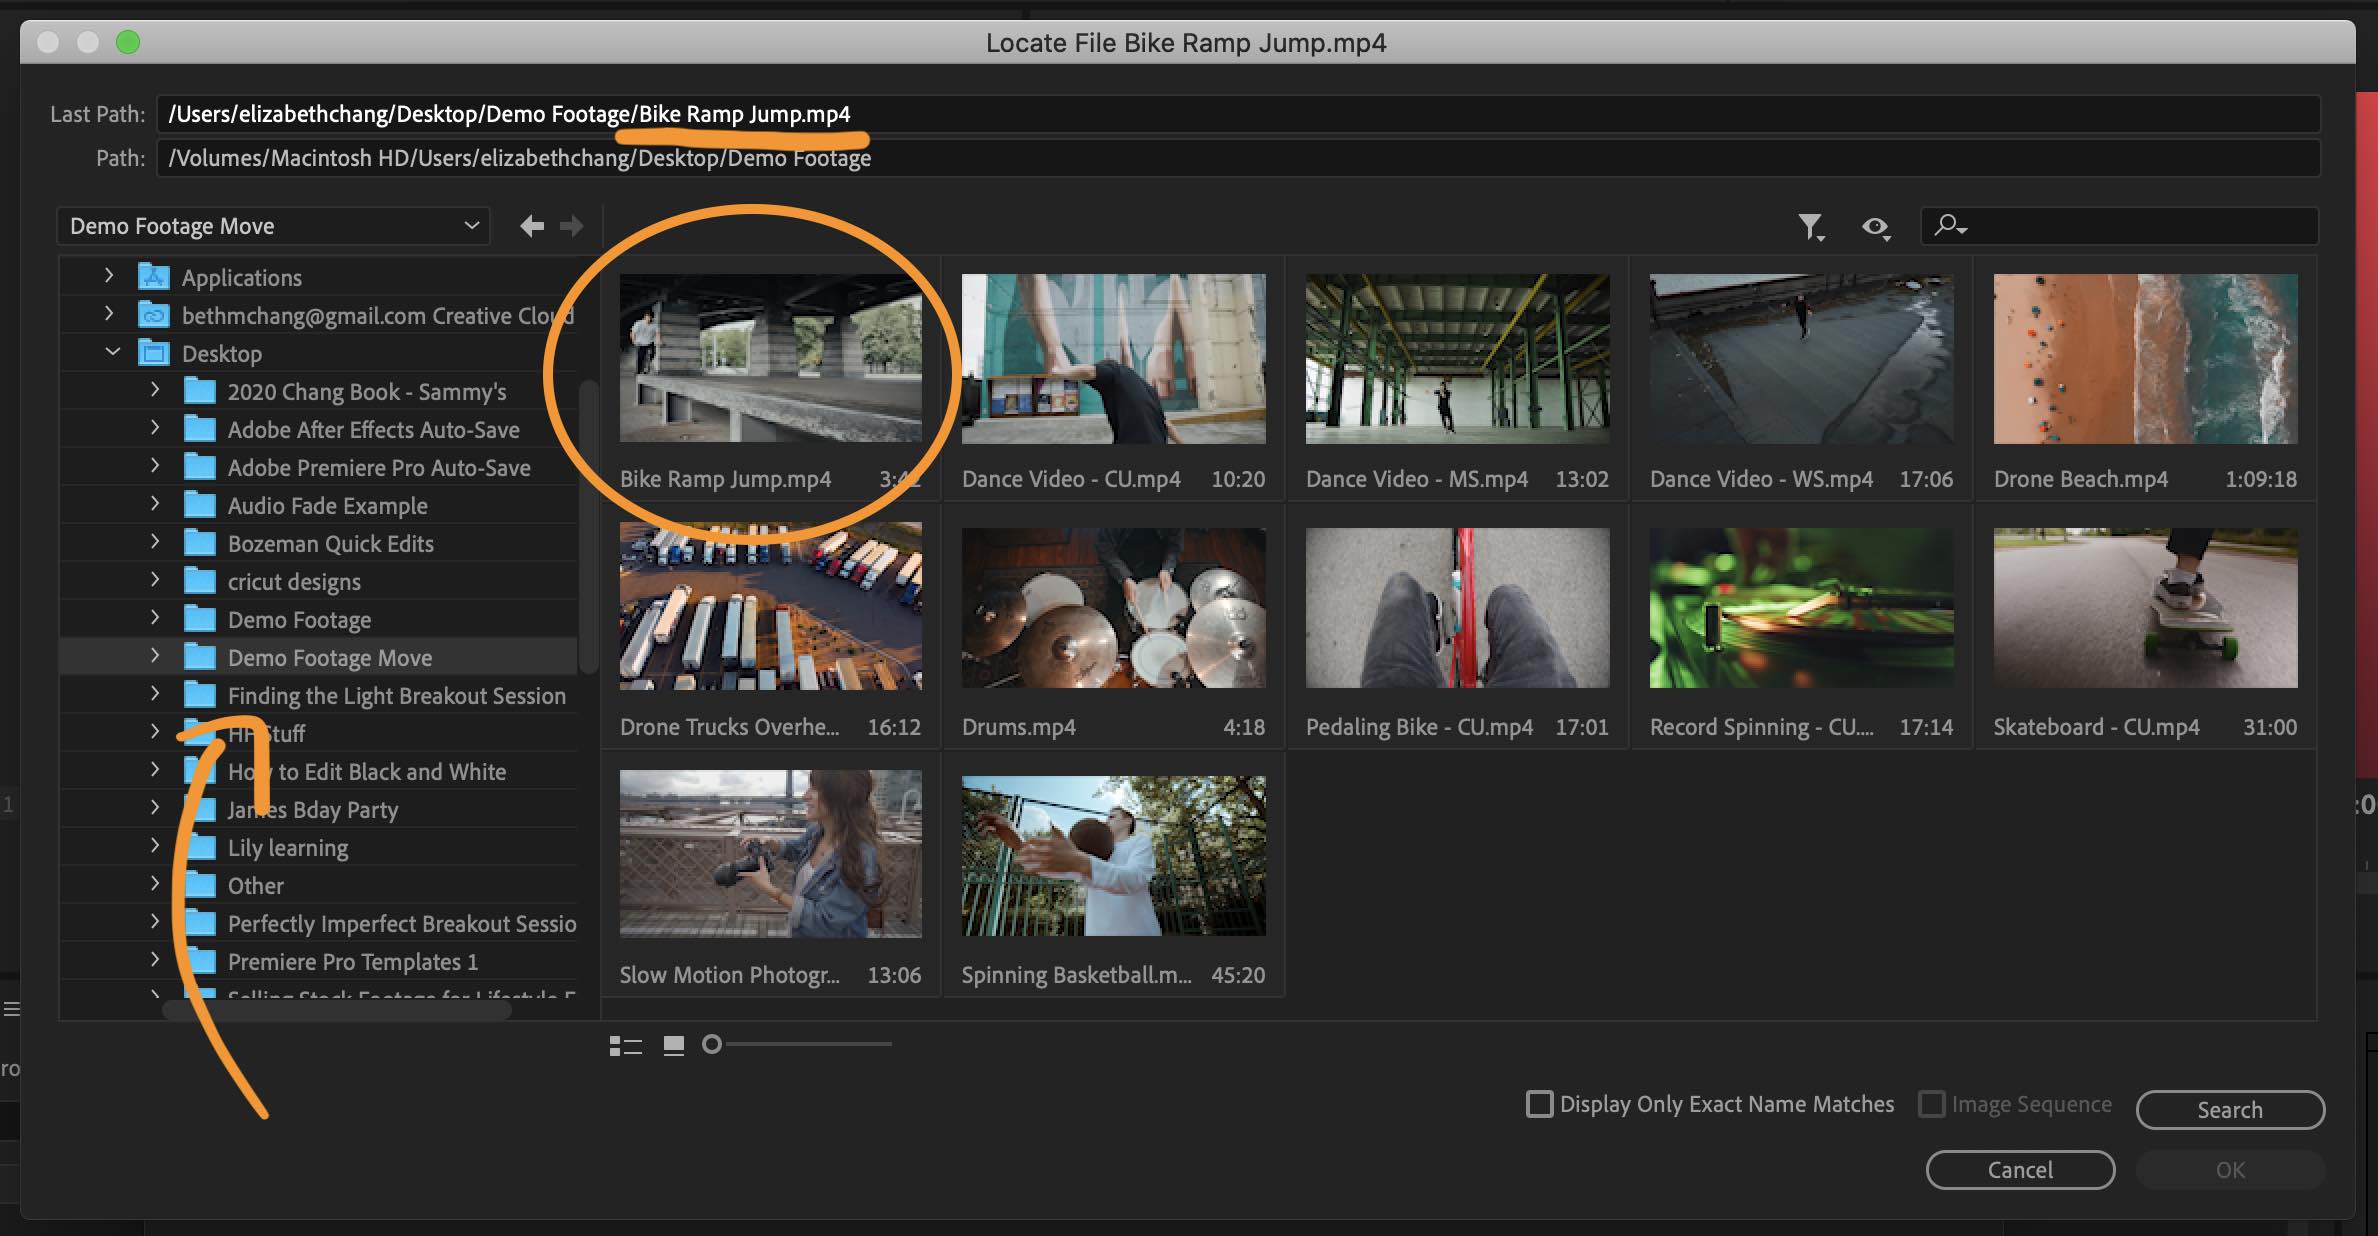
In this next window, you’ll see at the very top, the last place that Premiere Pro was able to locate your file, as well as the name of the file you are looking to connect.
On the left side, you will use this window to navigate to the new location of your footage. When you select a folder, it’s contents will appear in the main portion of the window.
If you find your clip right away, then you can select that single clip and hit ‘OK’ in the lower right hand corner.
If you can’t find your clip and aren’t sure where it is on your computer, then you can hit the ‘search’ button.
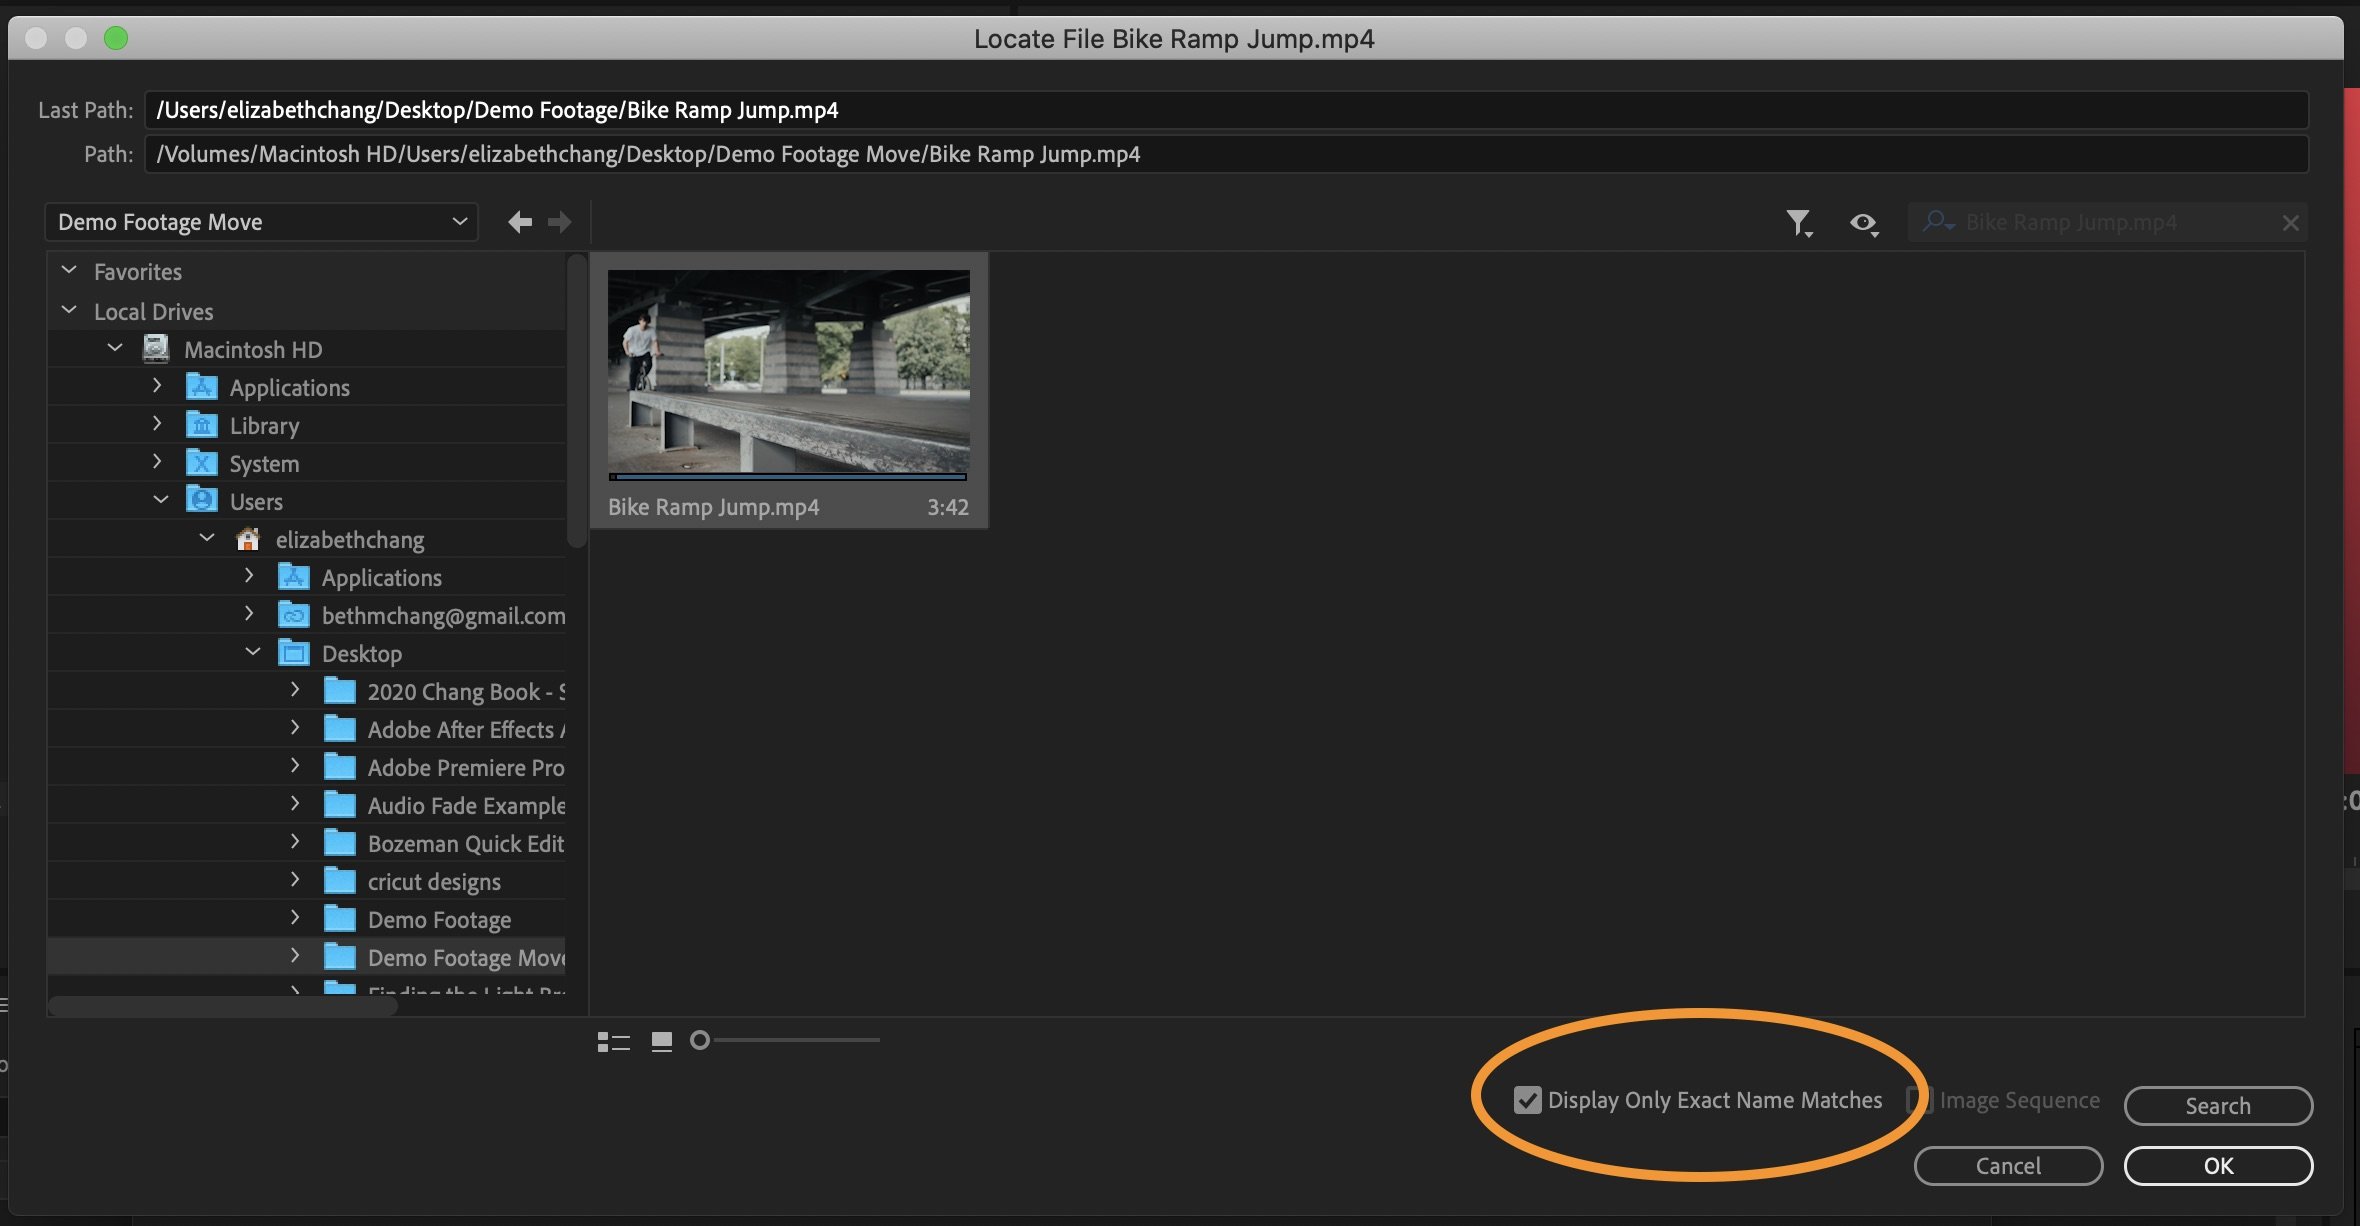
Lastly, if your clip is hard to find but you know you’re in the right folder (say the file has a long numerical name or you have tons of clips to sort through), you can click the option ‘Display Only Exact Name Matches’ to help narrow down your search.
Note: this only works if you haven’t changed the name or extension of your file.
Hit ‘OK’ and Premiere Pro will now reconnect and relink your media automatically.
Assuming you haven’t moved individual files into all different folders, Premiere Pro will be able to locate multiple files all at once.
For example, if you’ve moved an entire project folder from one drive to another, but haven’t changed the inner structure of that folder, Premiere Pro will be able to locate all the files at once.
Scenario 2: If you renamed a file or converted to a different extension.
If you have changed the name of a folder or a file within your project then you will follow most of the same steps above, but first you need to make sure you uncheck the ‘File Name’ default option under ‘Match File Properties’.

You also need to uncheck the second option for ‘File Extension’ if you’ve converted a file (from .MOV to .MP4, for example) from one format to another.
Now when you hit ‘Locate’, you’ll navigate to the newly named file, select it and hit ‘OK’ to reconnect your footage.
The Importance of File Organization
Now that you know why this error may have happened to you, you’ll understand much better why it’s so critical to be organized with your project from the start.
Any time that you make a single change to your folder structure or the files within them, you’ll have to reconnect those files again.
I have a specific folder structure that I use for all my video projects, which makes it very easy anytime I start a new project.
It looks like this:
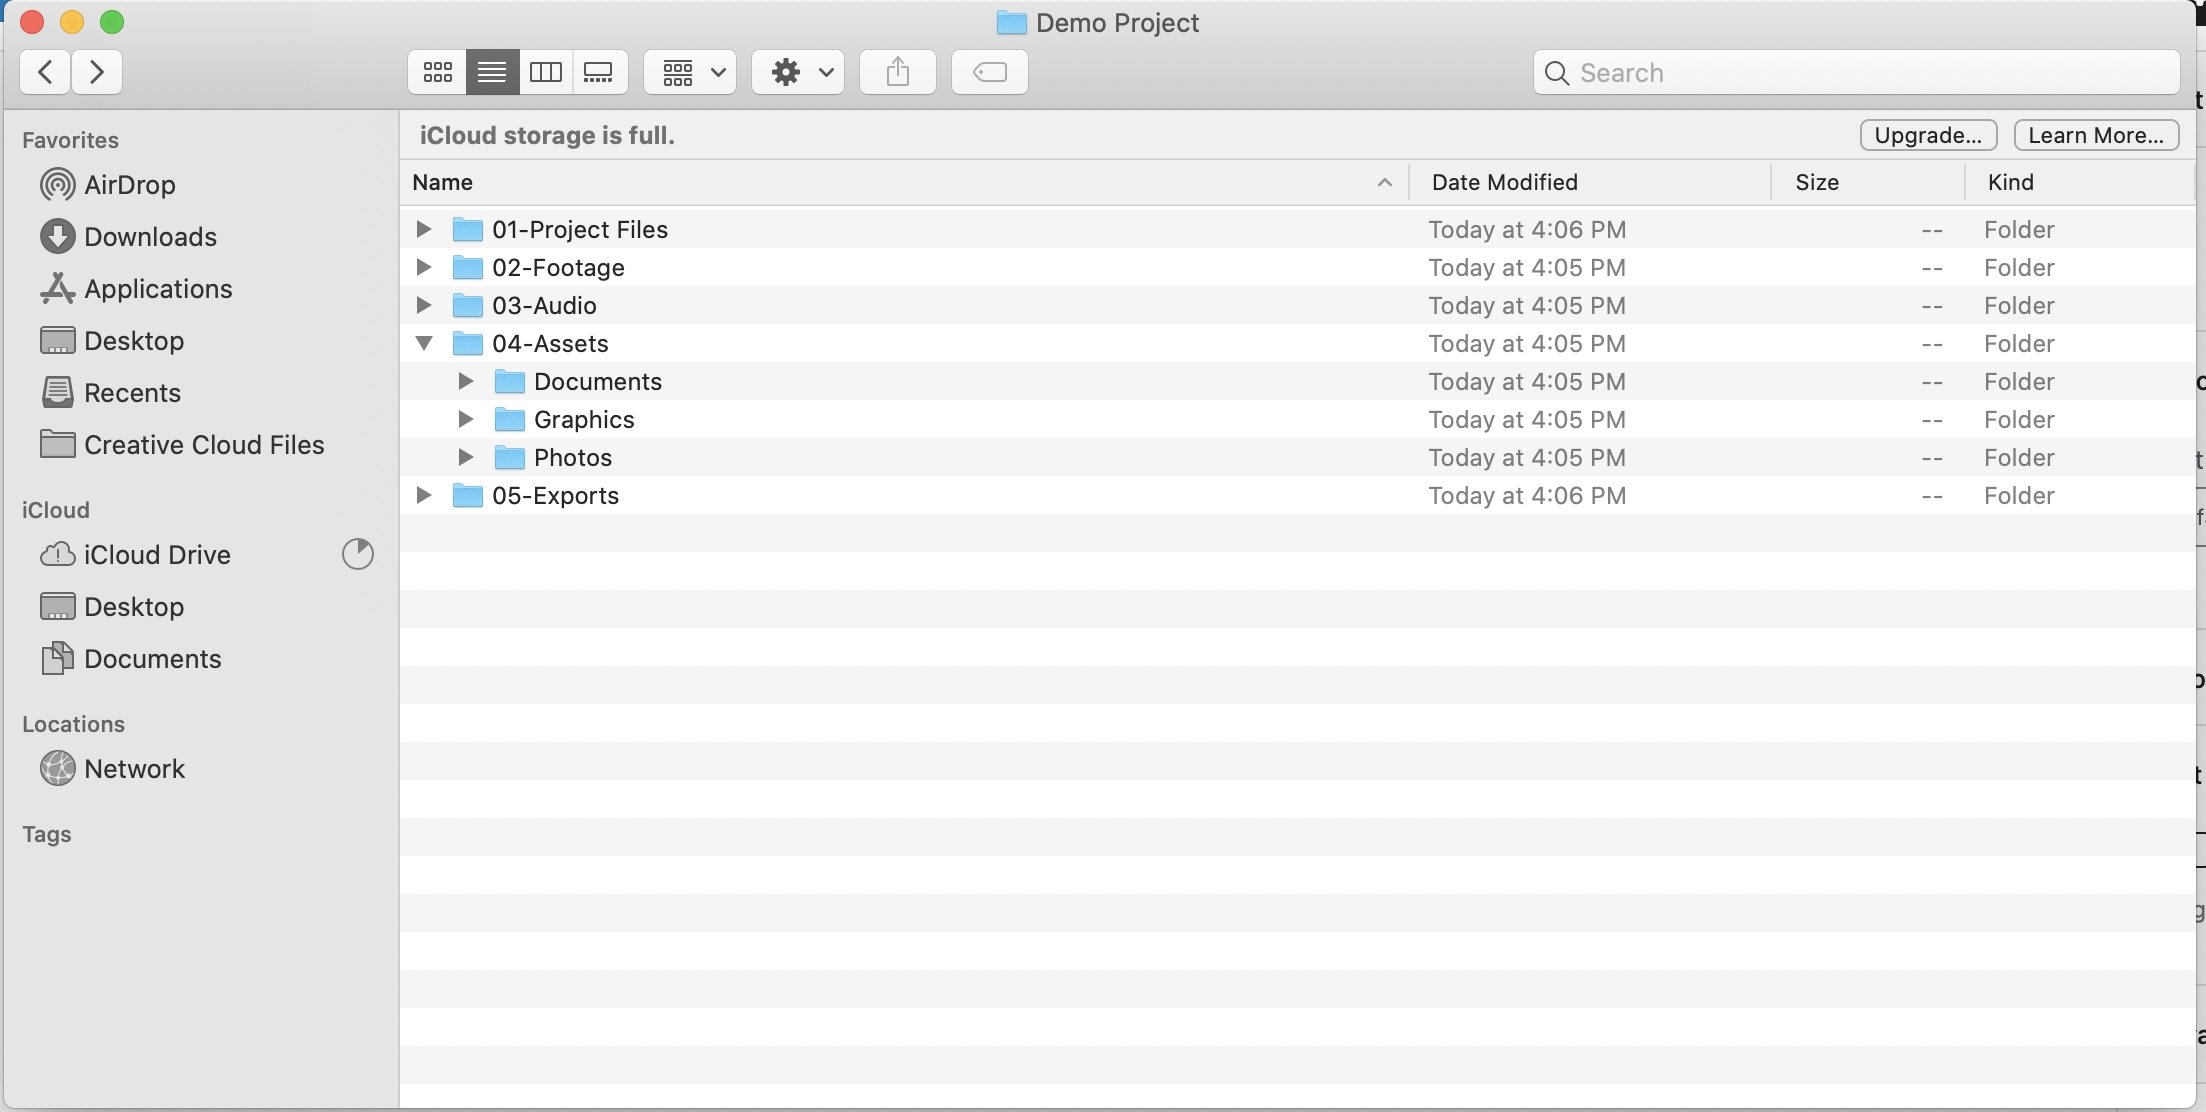
As you can see, I have a separate folder for the most common types of files that I’ll have within my video projects.
I simply copy and paste this structure each and every time that I start a new project.
Feel free to copy my layout or create your own in a way that makes sense for you.
The point is to have a structure in place that allows you to keep your files organized from the start so you never end up moving them halfway through your edit.
Concluding Thoughts
That about wraps it up, guys.
Let me know if this helped solved your problem. Any further questions? Leave them for me in the comment box below.
Thanks!
-Beth