One of my video editing professors in college said this phrase all the time:
Save your work, save your job.
It only takes one time to learn that painful lesson.
Imagine: you’ve spent hours of detailed time working on a project only to have a sudden, unprecedented error from Premiere Pro. And now all that work is erased. Completely gone.
Believe me, it’s happened to the best of us. And likely more than once.
Thankfully, Premiere Pro’s built-in Autosave function works seamlessly as you work, saving various versions of your edits as you work.
In today’s post, we’ll cover everything you need to know about setting up Autosave on Premiere Pro.
We’ll also cover how you might be able to salvage a lost or erased project by searching the autosave vaults of Premiere Pro.
Be sure to check out more beginner Premiere Pro tutorials here.
This post does contain Amazon product recommendations. As an Amazon associate, I receive compensation for qualifying purchases, however any commission that I earn comes at no cost to you.
Step 1: Set Up Autosave Preferences in Premiere Pro
In the top menu bar, navigate to Preferences -> Auto Save

You’ll now see the Autosave Preferences window open up, giving you a few options to set up in Premiere Pro.
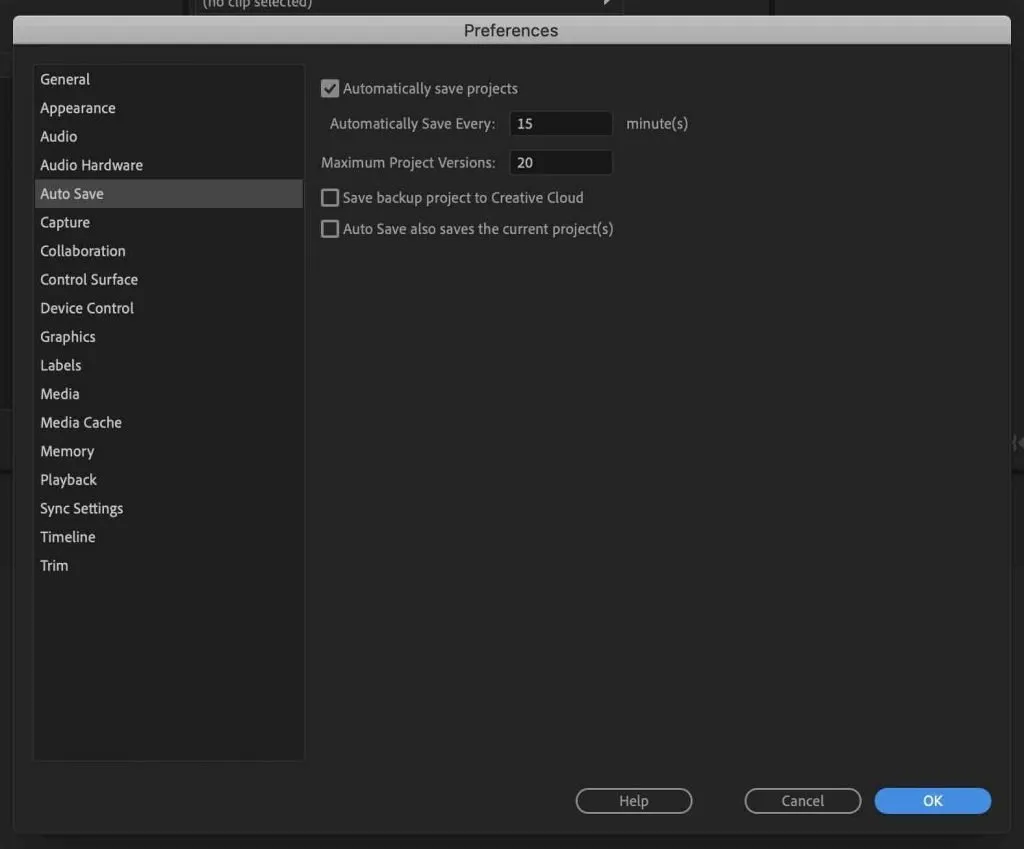
Step 2: Recommended Settings for Premiere Pro Autosave
Now that we’ve located where to change all the preferences, let’s discuss the best options for those preferences.
How often to save your projects?
By default, this is set to every 15 minutes. In my opinion, this is way too long. As an efficient editor, you probably already know how much work can happen in 15 minutes.
Instead, I recommend setting this preference to every 3-5 minutes.
How many project versions to save?
This option is set at 20 projects by default. What this means is that once Premiere Pro has saved 20 total projects, when it goes to save the next project, the oldest one of the 20 will be deleted and replaced by the most recent.
The 20 autosave projects will always be your 20 most recent edits.
I recommend going much higher than 20 copies, especially since we’ve just told Premiere Pro to save our project more often.
If you’re working all day on a project and you decide later that something was messed up and you didn’t realize it until the next day, you’ll have more options to find an older project from the day before.
I set this option to 100 project versions.
Plus, Premiere Pro project files generally aren’t that file heavy. It shouldn’t take up too much more space on your drive to save lots of files. You can always delete these excess autosave files once you’ve finished your project.
Save backup project to Creative Cloud?
Yes, definitely. This is an excellent option to have checked. Not only are creative cloud plans very inexpensive, they are the safest way to save your project.
You want to save your project in more than one location, just in case something happens to the hard drive where your main project is saved.
I believe creative cloud is the safest storage option since it’s not subject to being dropped or damaged by water, fire, or any other elements that our home computers and drives are subject to.
Amazon Drive seems to be the most affordable option, especially if you are already a prime member. It’s free for prime members and only $11.99 per year if you aren’t. You get up to 100 GB of storage for your files or you can upgrade to 1 TB of storage for $59.99 per year. This is still about what you’d pay for an external hard drive of that size. Find out more about using this service here.
Auto Save also saves the current project(s)?
This is asking whether you want to save the current project you are working on in the same main location where you created the file or if you simply want the auto-save files to be saved in a separate location, namely the scratch disk.
I do recommend saving your original file, plus autosave files in separate locations. This gives you much more security if something happens to your main hard drive – a crash or anything else where a drive can fail.
Here is an excellent and affordable external hard drive that I’d recommend for saving all your autosave project files:
- Easily store and access 2TB to content on the go with the Seagate Portable Drive, a USB external hard drive
- Designed to work with Windows or Mac computers, this external hard drive makes backup a snap just drag and drop
- To get set up, connect the portable hard drive to a computer for automatic recognition no software required
- This USB drive provides plug and play simplicity with the included 18 inch USB 3.0 cable
Last update on 2024-04-21 / Affiliate links / Images from Amazon Product Advertising API
Where Are My Autosave Files Located?
By default, your autosave files will be saved in the same folder as your project file.
While, this may seem logical and easy to locate… it’s dangerous.
If something happens to either your computer or hard drive where your original file is saved, you want to be sure your backups are saved in a separate location.
For this reason, I recommend setting your scratch disks to an entirely different location for your autosave files.
Here’s how to do it.
What Is a Scratch Disk?
A scratch disk is simply a specified location on your computer or hard drive where you’d like to save certain types of files.
The reason it’s called a ‘scratch’ disk is because it’s typically where you’d save files that are often replaced or deleted once a project is completed in order to preserve more space on your hard drive.
Scratch disks don’t typically house crucial or important files that you’d never want to delete, but rather ‘notes’ or ‘preferences’ depending on the program for which you are using them.
Using Scratch Disk For Autosave Files
Even though autosave files are certainly important, they are constantly being overwritten by newer project revisions.
They also become irrelevant once a project is completed. At that point in time you may want to free up space on your hard drive and clear your scratch disk or cache files.
But during active edits of a project, the scratch disk is an excellent place to set up a secondary location for which to house your autosave files.
How to Save Autosave Files to an External Hard Drive
1 | You’ll start by opening up your scratch disks on Premiere Pro.
Navigate in the upper menu to ‘File -> Project Settings -> Scratch Disks…‘

2 | Next you’ll navigate down to the ‘Project Auto Save:‘ option and note the options in the drop down. By default, it’s set to ‘Same as Project‘. We want to change this to our external hard drive.
3 | Click on the ‘Browse…‘ button on the right and you’ll see a new window open up allowing you to navigate to the exact location where you can create a new destination for your autosave files.

In What Scenarios Will Autosave Save Your Butt?
Now that you know exactly how to set up autosave in Premiere Pro, as well as how to customize the location and settings for your autosave project files, let’s talk about why it’s so important.
Scenario 1: You’ve accidentally deleted an audio layer and didn’t realize it until the next day. Boom, find the autosaved version from the day before and recover the audio layer that you accidentally deleted.
Scenario 2: An unexpected crash from Premiere Pro completely deletes your project. This is the obvious scenario, but an important one nonetheless. With autosave setup for every 3-5 minutes, no matter the crash, you shouldn’t lose too much valuable work.
Scenario 3: Your hard drive crashes without notice. It happens and here’s where it’s important to make sure that your autosave files are backed up in a separate location from your main hard drive.
How to Locate Your Autosave Files in Case Your File is Corrupted or Crashes
For those of you who are in this situation currently and trying desperately to recover a previous file that’s been lost or corrupted, I feel your pain.
Let’s try to see if we can solve the problem by locating your previous autosaved files.
If you’re unsure whether or not you’ve ever set up the autosave function in Premiere Pro, it’s likely that Premiere Pro has been doing it for you by default.
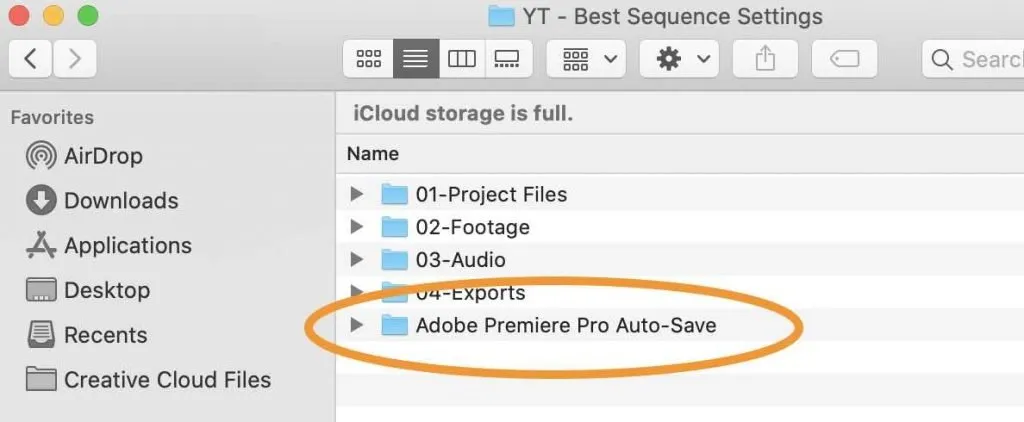
Navigate to the same folder where your main project files are generally saved.
If you see another folder named ‘Adobe Premiere Pro Auto Save‘, then click to open that folder and you should (hopefully) see a list of project variations with timestamps of your previously edited projects.
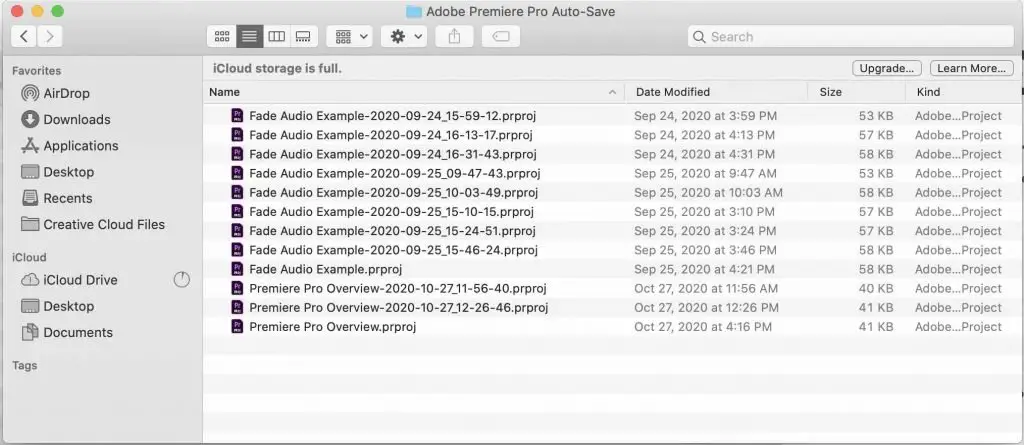
Find the most recent or relevant project and timestamp and open to see a fully recovered project file.
If you don’t see the Adobe Premiere Pro Auto Save folder in the same location as your project file, be sure to search around on your computer to see if it happens to have been moved or located elsewhere.
I hope that helps save your project. Leave me any further questions or comments in the comment box below!