It may not be the most exciting topic ever, but I assure you learning how to have structure and organization as a video editor is key to being faster, more efficient, and an overall better editor.
There are many reasons why staying organized within Premiere Pro is important, but one of the most critical is so that you don’t end up with missing media in the future from having to move files around after you’ve started your edit.
Understanding How Premiere Pro Works
See, once you’ve started building your project, if you then decide to rename or move any file within your project, your media will be disconnected and you’ll have to spend time retelling Premiere Pro where to find it.
For a step-by-step tutorial on how to do reconnect missing media in Premiere Pro, check out this post all about it.
Since Premiere Pro begins creating a blueprint or map of where your footage can be found from the moment you begin your edit, it’s important that you are organized and have thought through a system for how to set up all the folders that you will need for each project ahead of time.
In a moment, I’ll walk you through exactly how I organize all my footage and other files within specific folders for each type of video project.
Working With A Team
When I first began my career as a video editor, I went from working freelance and completely on my own to working with a team of other editors.
If I’m honest, it was a bit of a rude awakening. Can you imagine being handed a hard drive with someone else’s project that hasn’t been organized?
Sure you may remember how you named a certain file and where you put it. But we don’t all think the same way and we can’t read each other’s minds.
It was a nightmare trying to work back and forth on projects when they weren’t strictly organized.
We quickly adopted a folder organization system. This folder and file structure became the standard that all of us followed and eventually go used to using.
It made all of our lives world’s easier.
Even now that I work alone for the most part, I will never go back to a hasty, chaotic way of storing files and folders before editing.
It Will Save You Time
One of the most important qualities of a professional video editor is time management. The more efficient you can be with your time, the more projects you can take on, and the more money you’ll make in the end.
Not only that, but a bit of time spent up front getting yourself organized will end up saving you hours down the road, as well as a lot of headache.
When searching for a certain video file, graphic asset, or music track, you’ll know exactly where to go to hunt it down.
If you work on the fly in front of clients (like most of us do from time to time) or in front of your boss, think how much more professional you’ll be when they see how organized and well-kept your projects are. This will automatically give them so much more confidence in your ability as a video editor.
The better organized you are overall, the more mental energy you can spend actually editing and putting creative work into your projects.
How to Organize Your Folders Before Importing Into Premiere Pro
Now that we’ve covered why it’s so important to stay organized as an editor, let’s get into the details of exactly how you should structure your folders, hard drives, and projects.
Note: I will share with you my own system for organizing files and footage for video editing, but feel free to adapt your own structure to meet your specific needs as an editor.
We don’t all do the same exact type of work, so you may choose to delete, add, or rearrange some folders of your own.
This is completely fine and I encourage you to do so. The more important thing is to make sure you have a system that is overarching, yet flexible so that you’re not constantly having to change it.
You can copy and paste this folder structure and use it for every project, with perhaps only a few modifications each time.
Importance of Using an External Hard Drive
Before we get started with creating our outermost folder, I encourage you to set up an external hard drive if haven’t already.
Not only will this give you a safe place to store your project (if something were to happen to your computer), it also frees up space on your computer and makes long term storage much easier.
Here are a few ideas for external hard drives that I’ve used and recommend myself:
Best SSD Drive: Samsung 1 TB Drive (fastest and most reliable on this list)
Best External Hard Drive: Seagate 2 TB Drive (a little slower than an SSD drive, but twice the space and half the price)
How to Organize Folders on Your Hard Drive
Before we get into organizing the files of your project within Premiere Pro, it’s even more important that we set up our folders consistently on our external hard drive.
Here’s how I set up my outermost folders on my external hard drive:
Outermost Folder : Project Name
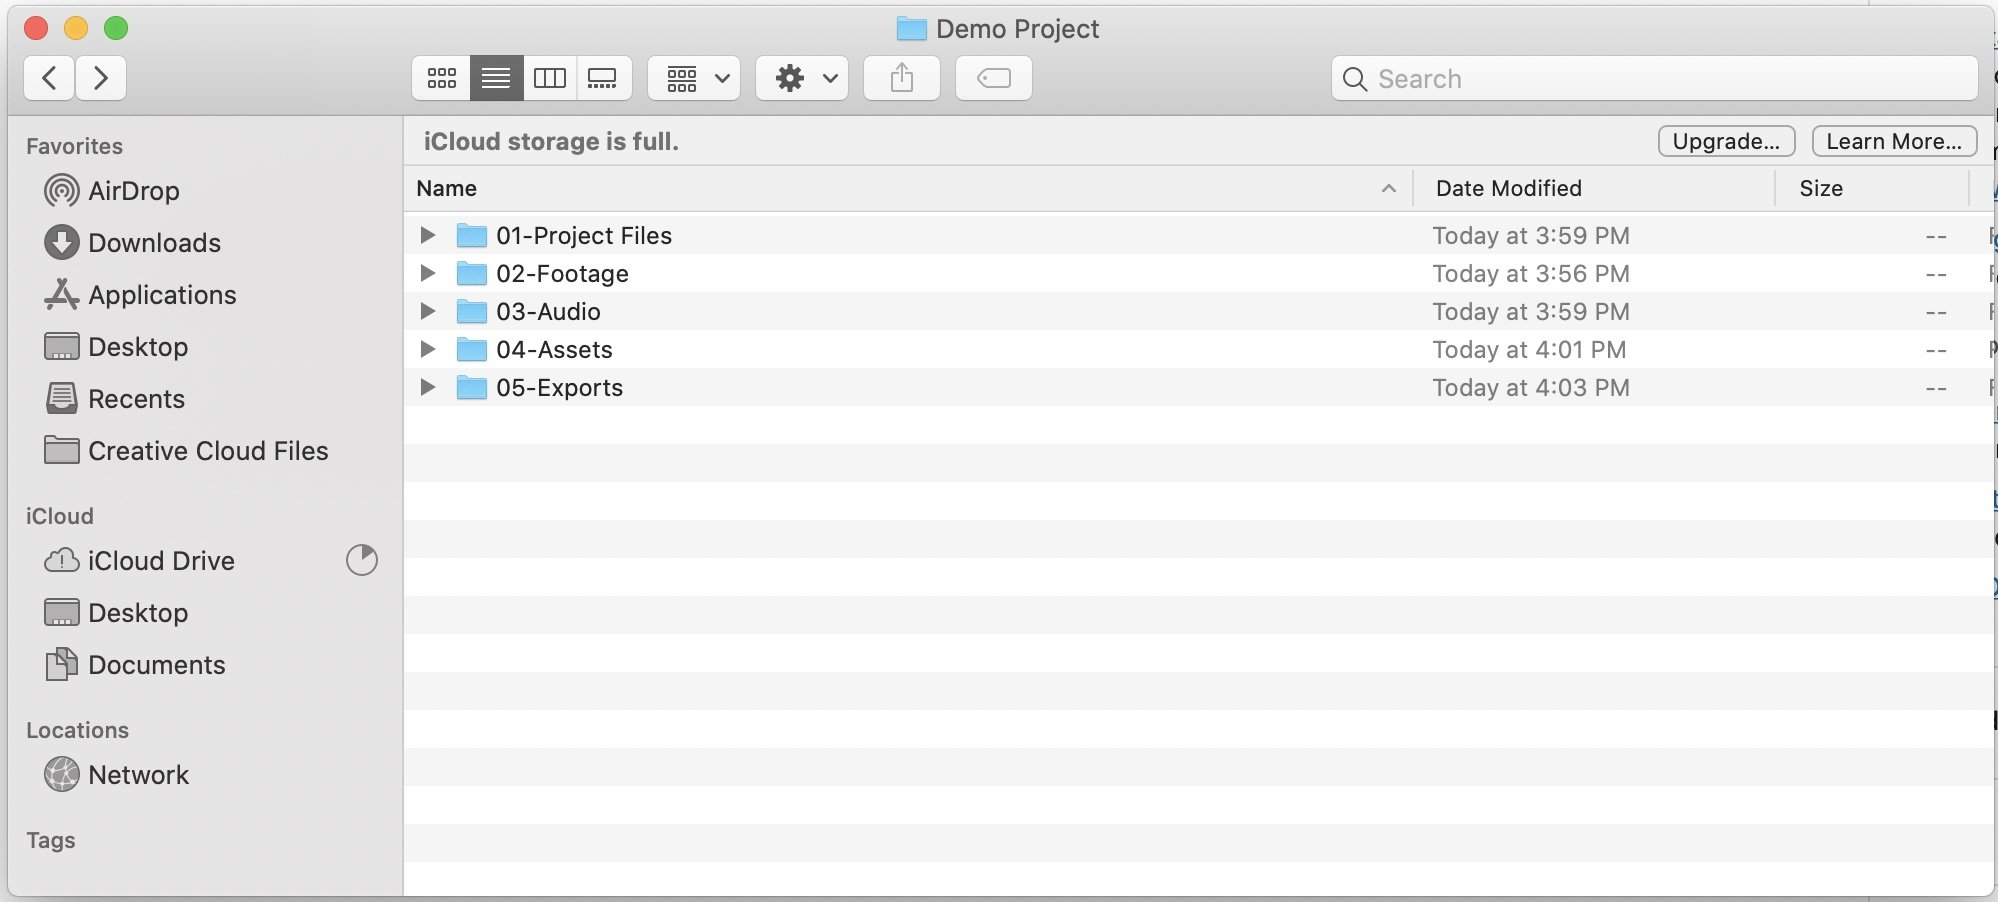
As you can see, I prefer to number each folder in order to keep them in the exact order that makes sense to me.
Folder 01 : Project Files
The first folder contains all of the various project files I will be using, including project files within Premiere Pro, as well as my other most commonly used Adobe software.
This is important because as you edit, you may want to save several versions of your projects throughout your edits.
Often, naming structure for project files looks something like this:
‘ProjectName_Date_Version’
And I may have anywhere from 5-10 variations in each folder.

Folder 02 : Footage
Next comes the footage folder.
Here, you may need to do some adjusting, depending on exactly what type of footage you typically capture.
This is going to look different for a wedding filmmaker than it will for a documentary filmmaker.
Does it make sense for you to organize based on multiple camera angles or does it make more sense for you to organize based on shoot days?
Here’s a generic version of what I generally start with and then depending on the project, I will tailor it a bit before adding my raw footage.
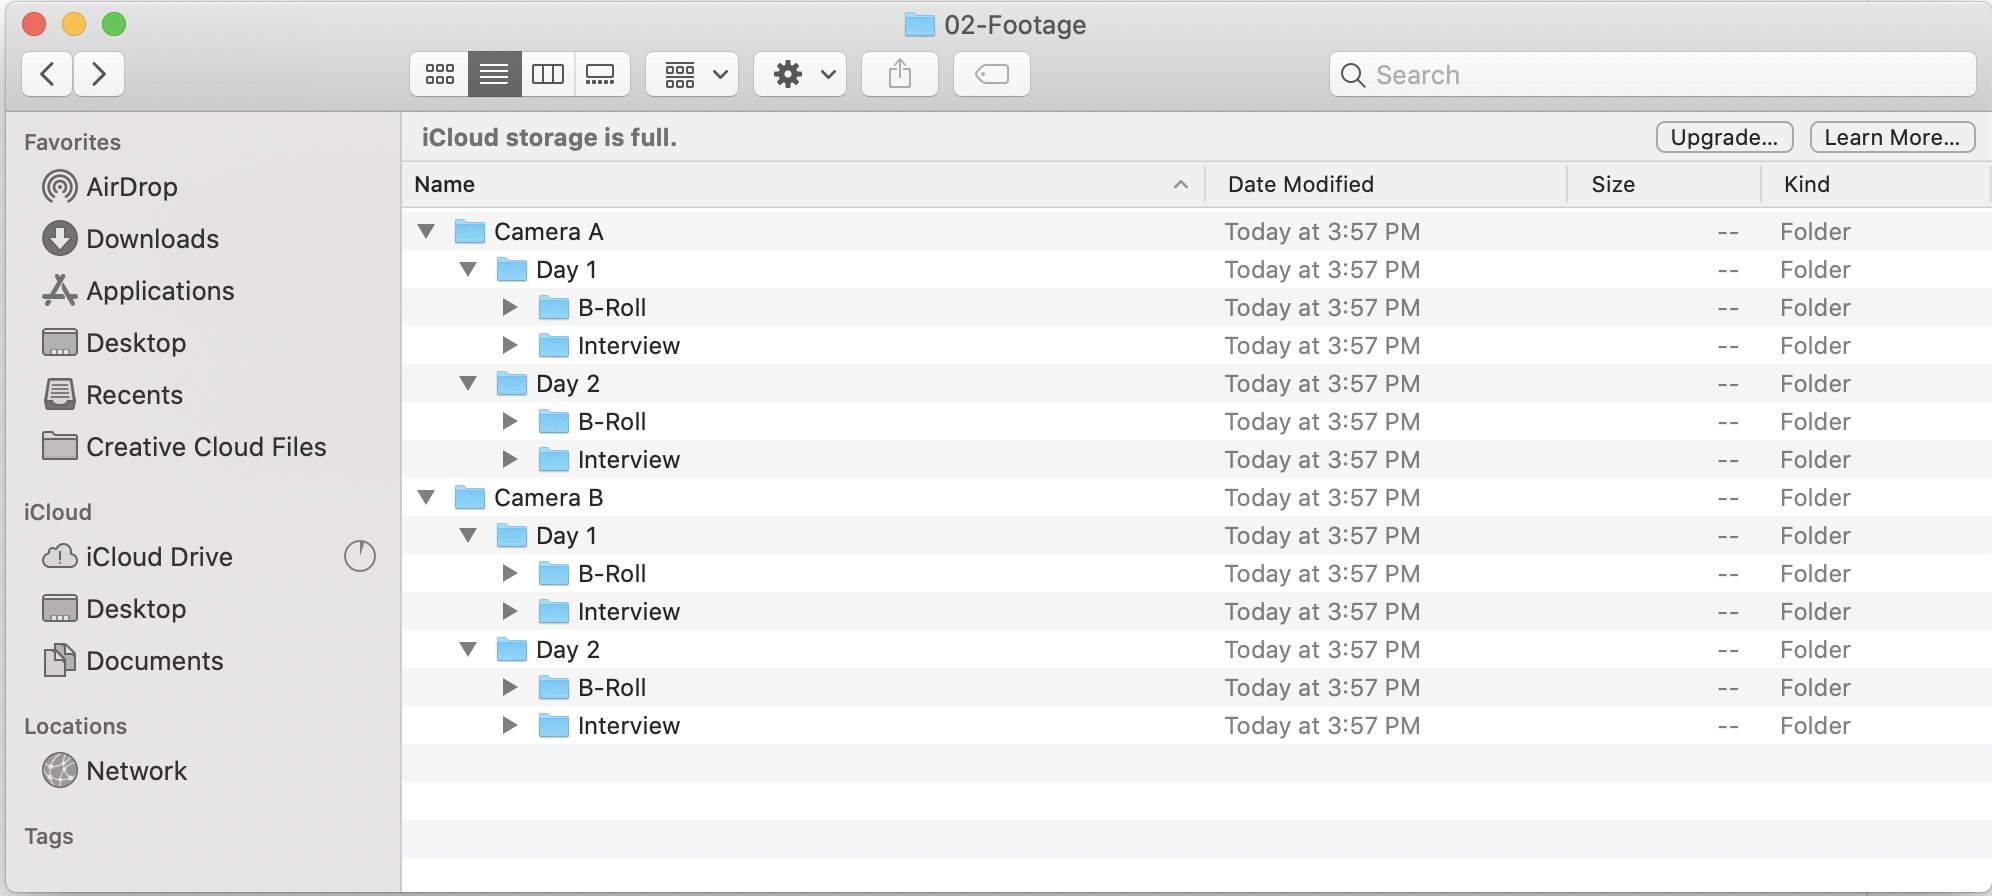
Note: if you shoot on a RED camera or other camera where footage files just aren’t easy to drag and drop from your card, then you can simply dump all your footage in one footage folder.
We’ll be organizing our footage in more detail within Premiere Pro as well.
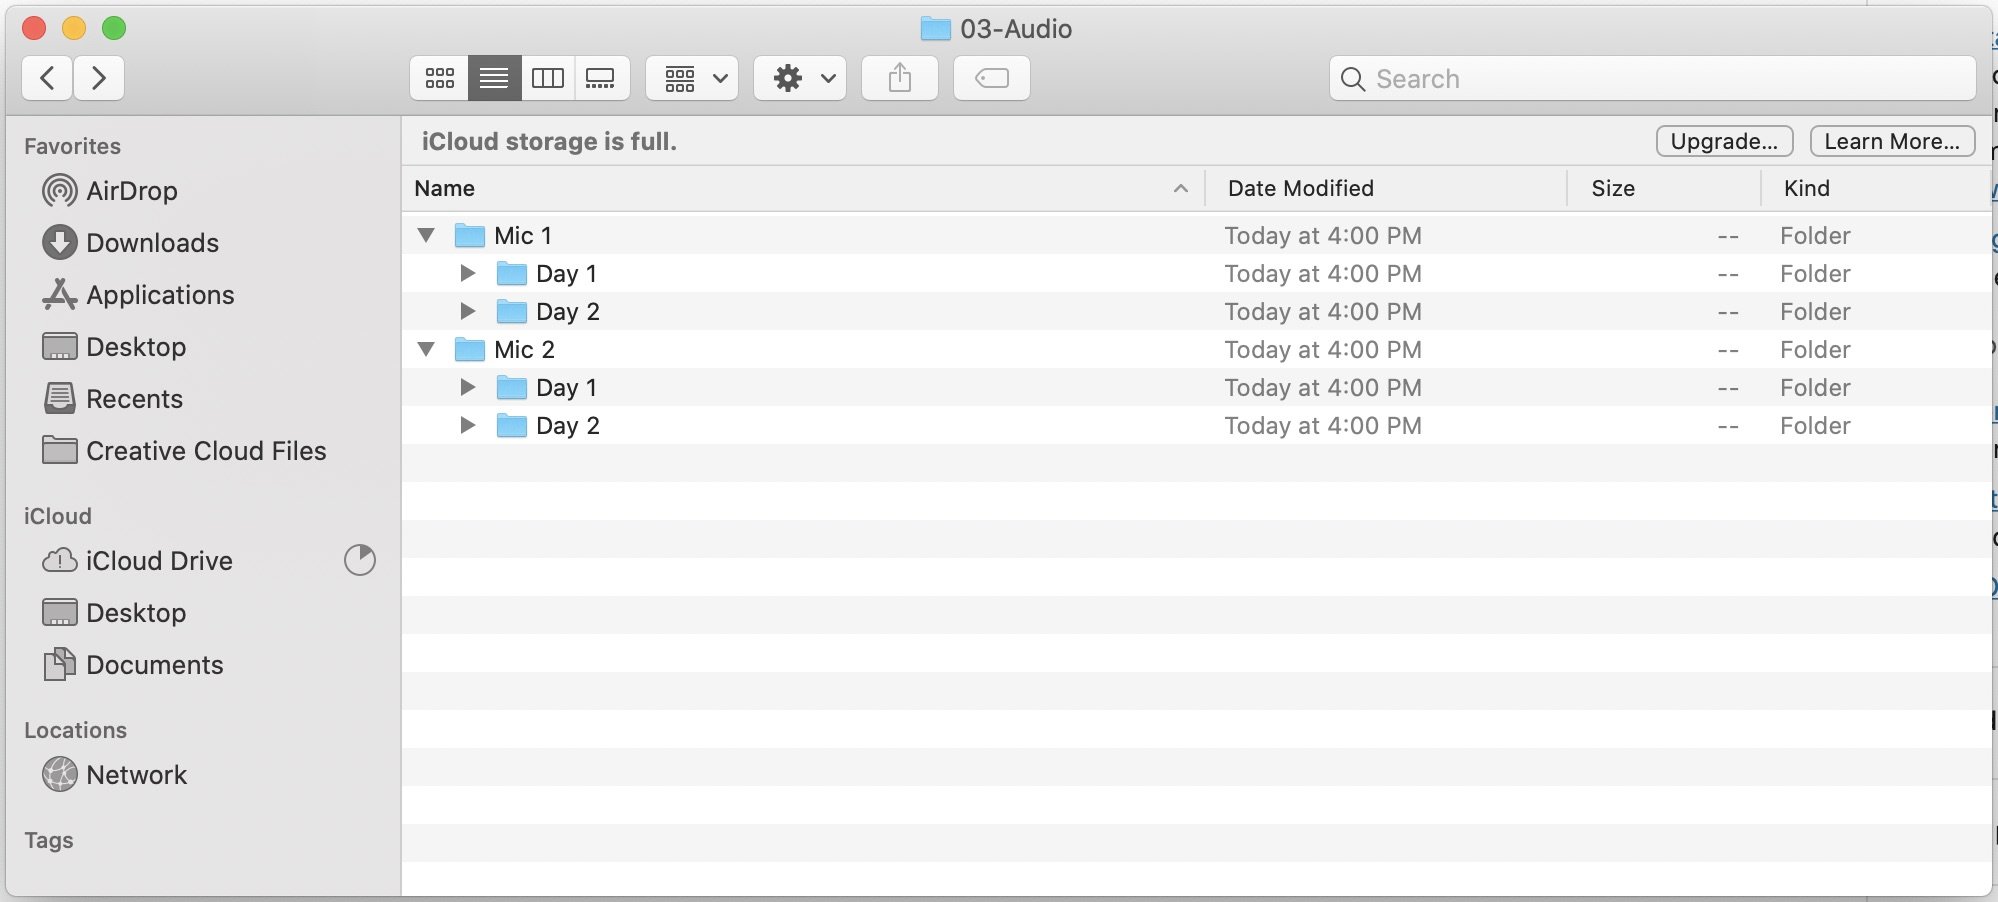
Folder 03 : Audio
Similarly, you may need to organize your audio files in a way that makes the most sense for you.
You might choose to organize by mic or simply by shoot days and location. The point is to create a system that makes sense for you.
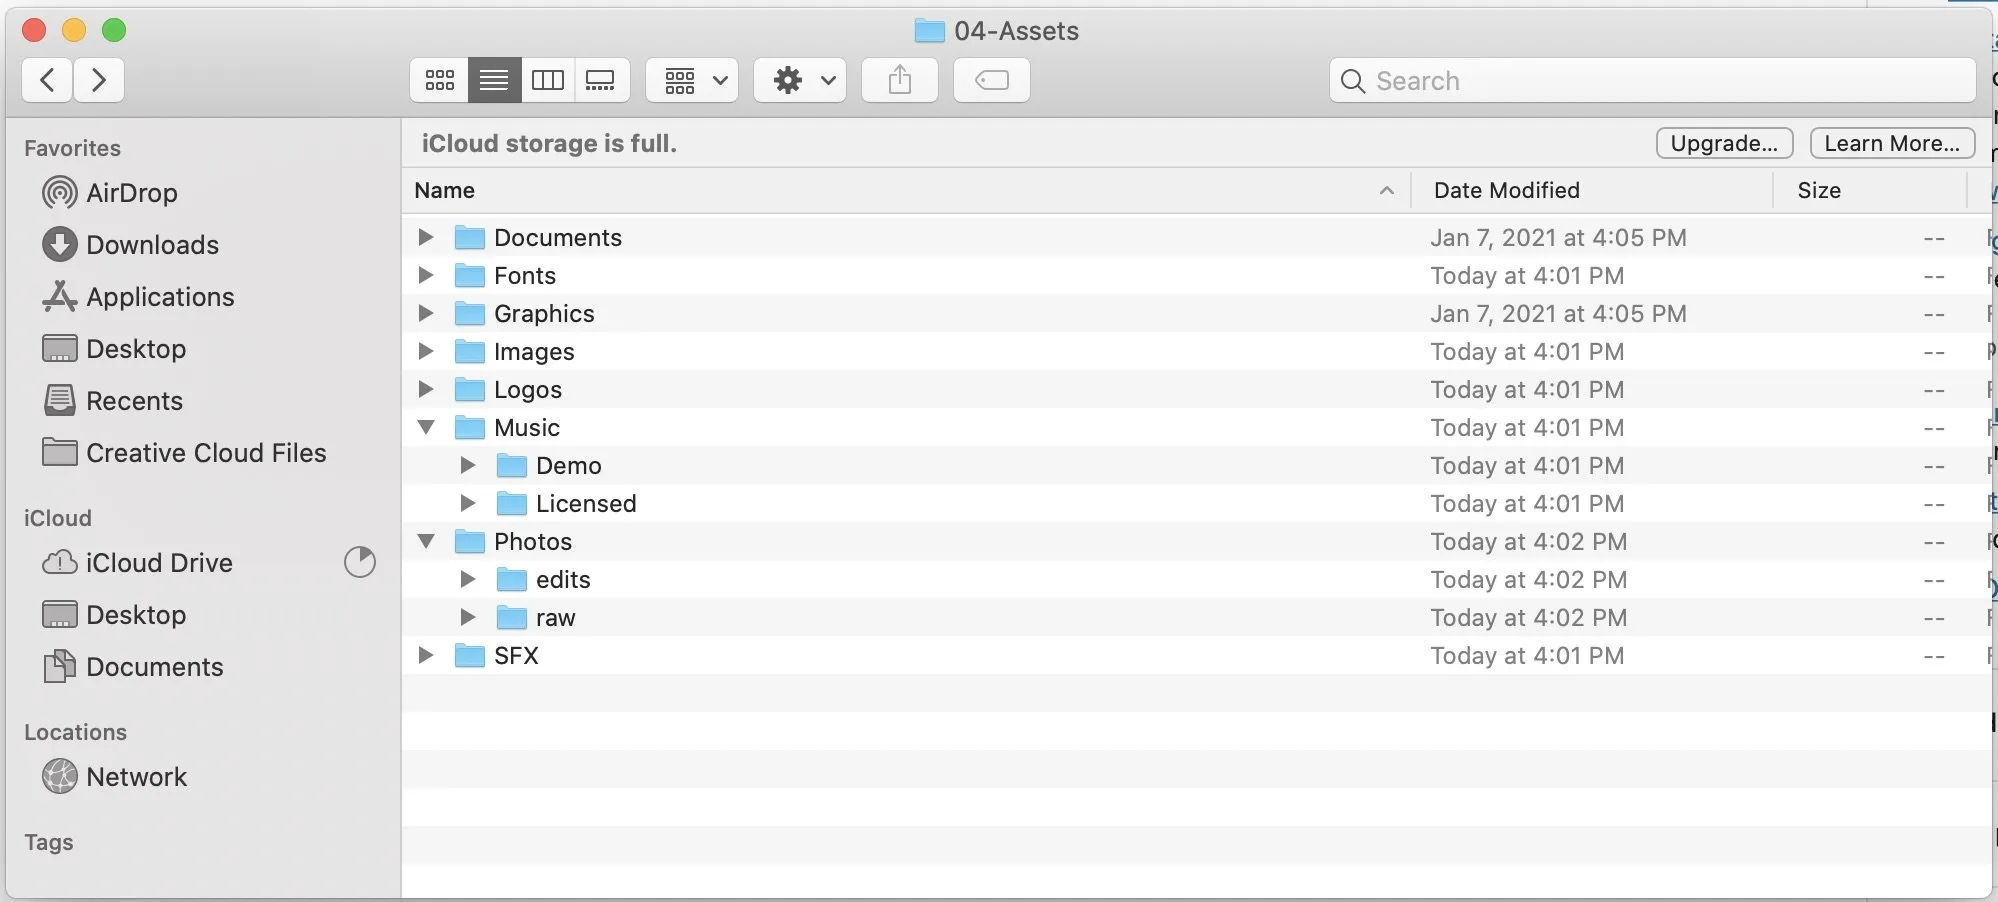
Folder 04 : Assets
Here’s where I try to make a home for everything else that doesn’t fit into the other main categories.
Again, this will be very personal to you and your typical projects.
When working with a team, this folder becomes very important as it’s often where important documents, notes, and shared graphic elements are shared.
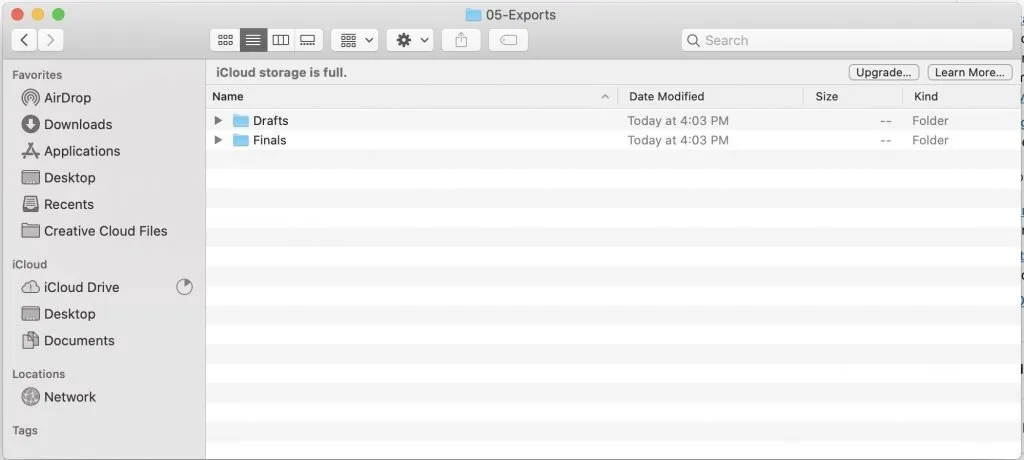
Folder 05 : Exports
Lastly, we have our exports folder.
You will likely have many versions of your final project and may want even more folders, but that will depend on your preference.
For example, you may want separate folders for ‘.MP4 Exports’, ‘.MOV Exports’, ‘4K Exports’, ‘Youtube Exports’, etc.
My file names for exports often look something like this:
‘ProjectName_Version_Date.mov’
Once you’ve created this master folder you can simply copy and paste the empty folder each and every time you begin a new project.
And now we are ready to open up Premiere Pro and look at how to organize our project.
How to Organize Within Your Premiere Pro Project Files
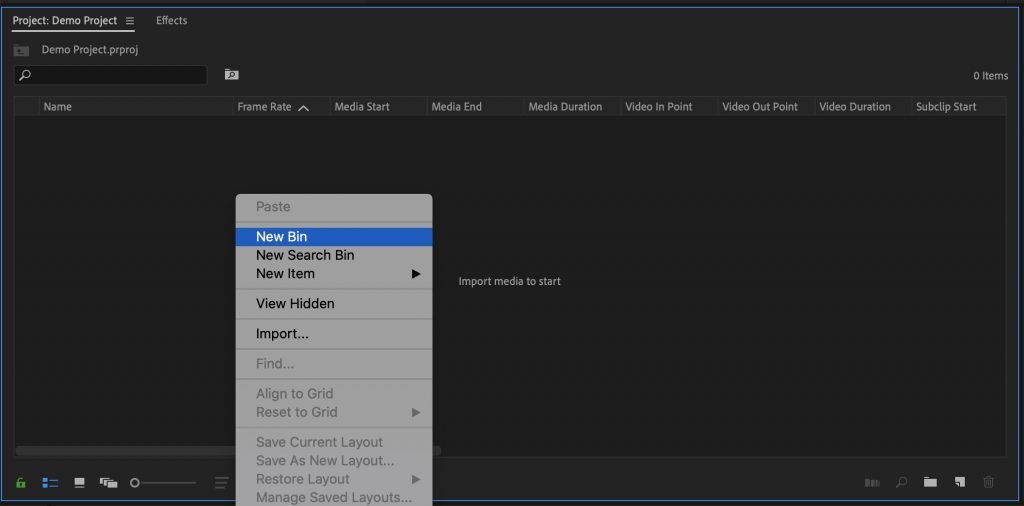
Once you’ve opened up Premiere Pro, let’s take a closer look at the Project Panel and start creating some new folders (or ‘bins’ as they are called in Premiere Pro).
To create a new bin or folder, right click anywhere in the Project Panel and hit ‘New Bin‘.
01: Footage Folder
I like to start with footage, so I name my first folder ’01: Footage’.
Then, I add any sub folders that would be relevant to the project. Here are a few examples:

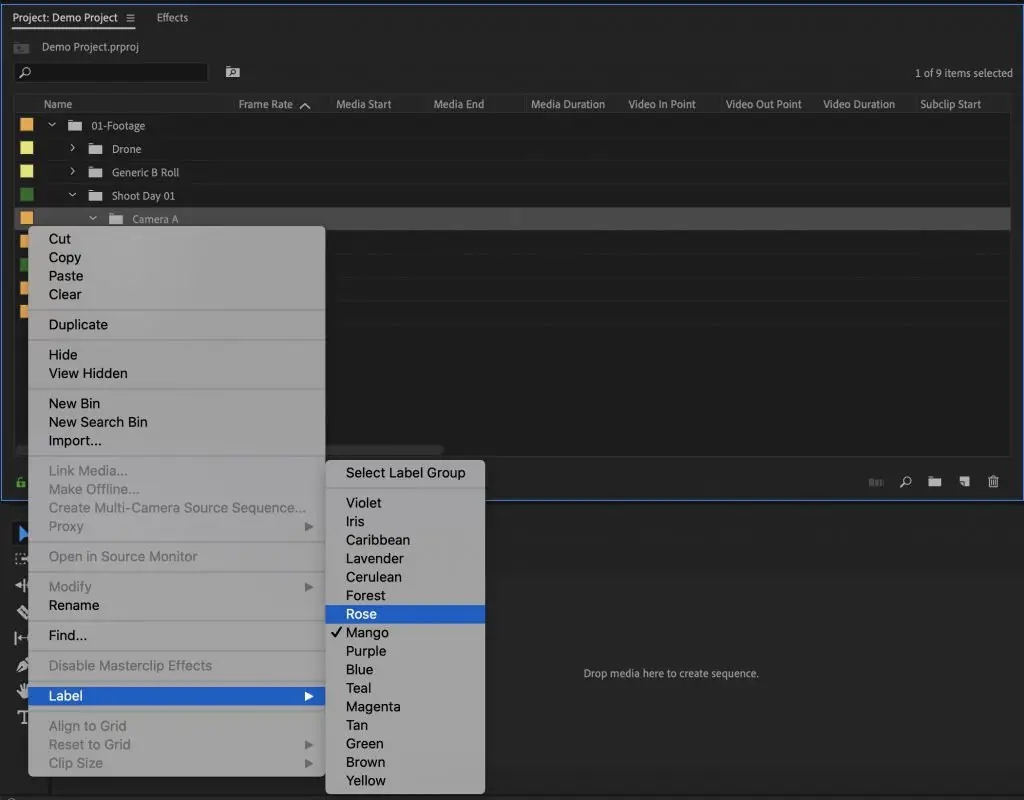
You can easily change the color of the little box to the left of each item by right clicking on the item and selecting ‘Label‘.
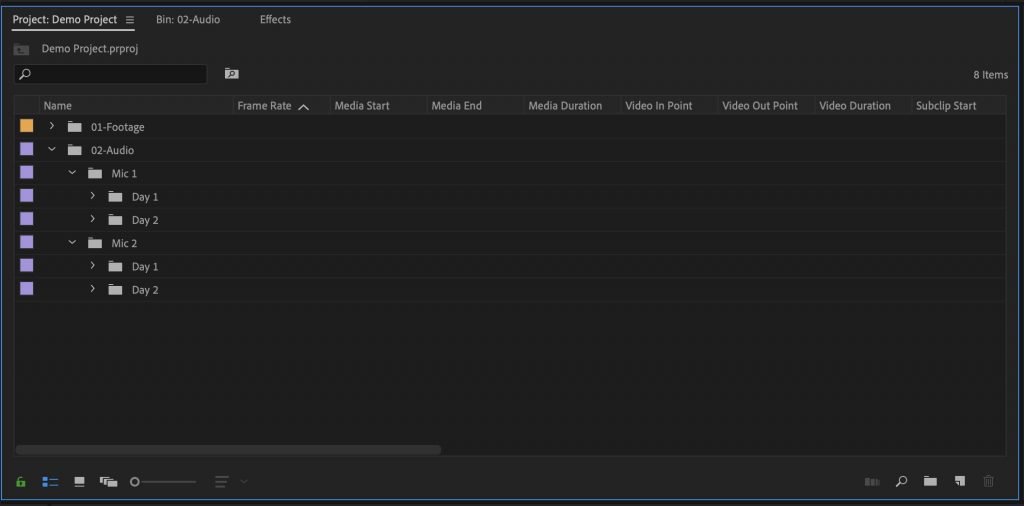
02: Audio Folder
Next, I drag in my audio files. These don’t include music files. By ‘audio’ I mean dialogue or ambient audio recorded by a microphone.
These are files that will be paired with your footage files, so you may consider organizing them in a similar way to your footage.
For example, if you organized by day for your footage, then you should organize your audio the same way. However, if you organized your footage by interview name, then you’ll want to organize your audio similarly.
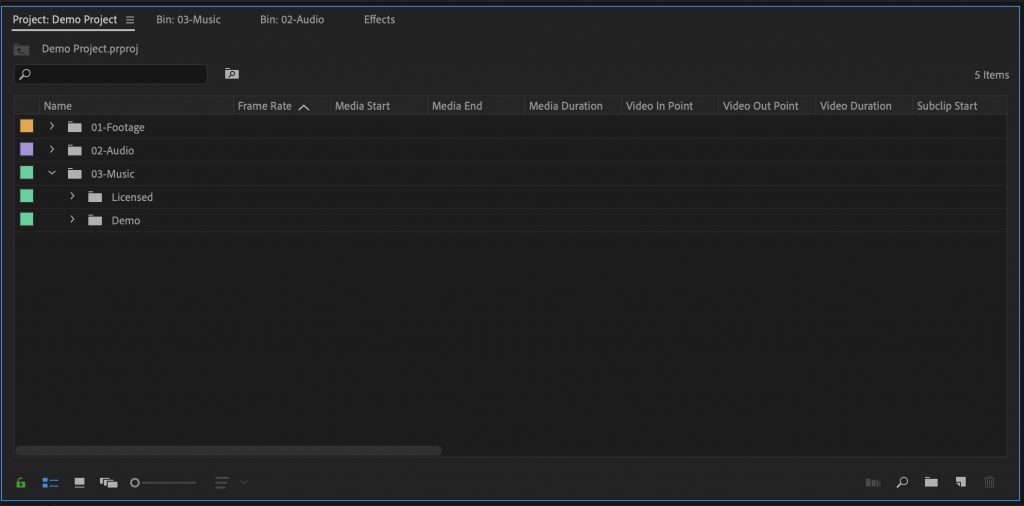
03: Music Folder
Next up, I create a separate folder just for music files. I have two sub folders where I can delineate between demo and licensed, to keep track of any tracks that may have audio watermarks on them.
In case you’re curious, here’s where I like to license all my music from.
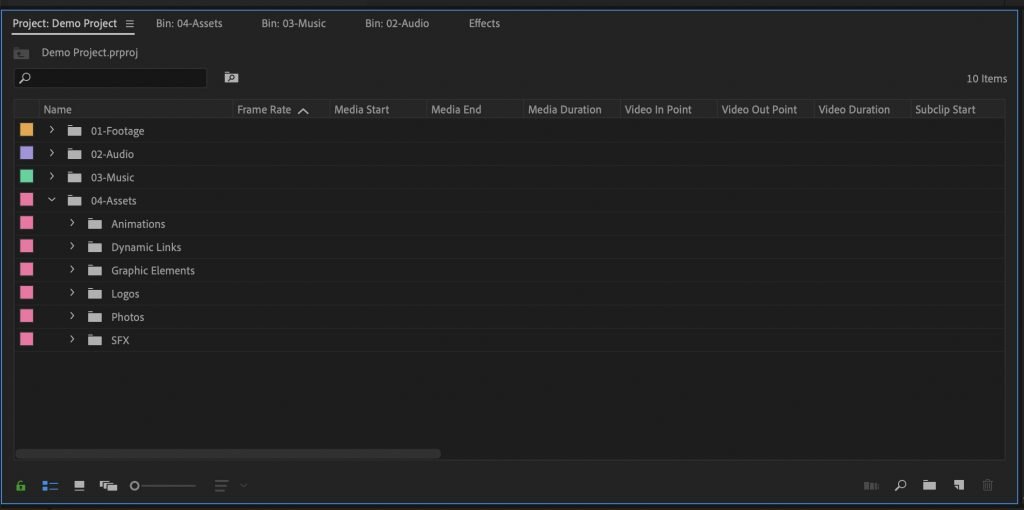
04: Assets Folder
A great number of files can go in this folder. I view as a grab bag for each project.
It’s where any extra graphics/logos or special effects go.
It’s also where I organize any dynamic links from project files within After Effects.
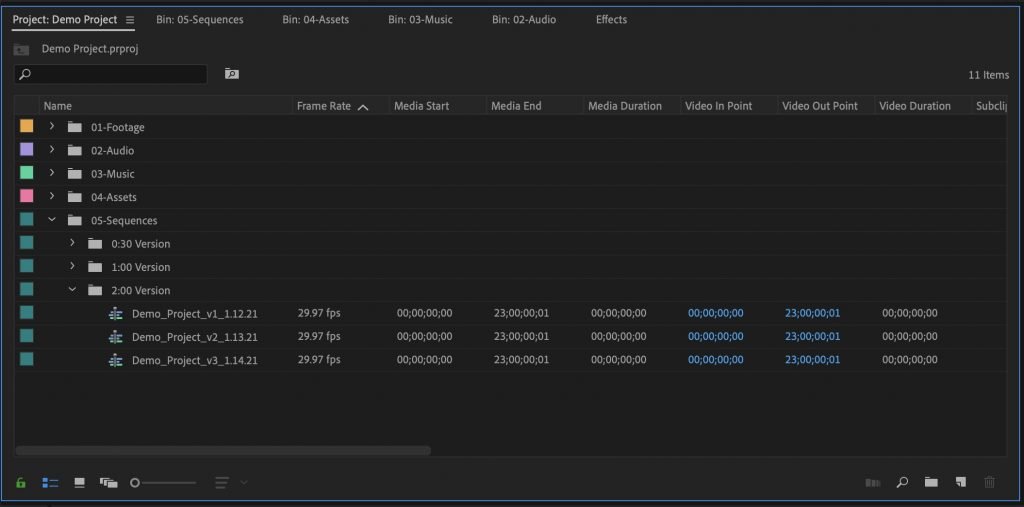
05: Sequences
Lastly we have our sequences folder.
Within this folder, you can organize the folders down as far as makes sense for your project.
If you know you will have multiple versions – a 30 second, a 1 minute, etc. version, then go ahead and make a folder for each of those versions.
By habit, each time I make any major edits to a sequence, I save a new version in this folder.
That way if ever I want to go back to changes I made several days before, I have them easily at my disposal.
This method isn’t labor or space intensive either. It hardly takes up any extra space on your hard drive and so is well worth the extra split second of effort.
To name my sequences, I usually use this format: ‘Project_Name_Version#_Date‘
Concluding Thoughts
I hope reading through my personal method of structuring and ordering my own files and folders has helped you narrow down a good way to organize your own.
Remember the point is to come up with a system that is flexible and makes sense for you so you can copy and paste it to reuse over and over.
It may seem a bit laborious at first, but once you get in the habit of it, it will be like second nature and will definitely save time in the long run.
Thanks for reading along!
As always, I’m happy to respond to any questions or comments you have below.
-Beth
Share on Pinterest: