Find exactly where your stock photos are being used online.
Every now and then I sit down and have a little fun searching for some of my most commonly downloaded images online.
It’s so surprising to see where they end up!
In this post I’ll share with you exactly how to track down your own stock photos, as well as share with you where I have found some of my own.
This is also a useful practice to do every so often to keep track of your photos online and make sure that they aren’t being used illegally.
Unfortunately theft of stock photos is fairly common. You want to periodically check and make sure that no one has taken your stock photo as their own to try and get sales from it.
Pssst!
Want to dive even deeper? If you’ve read my monthly income reports then you already know that I haven’t added a single clip or photo to my portfolio since January this year, and yet I’m still making hundreds of dollars each and every month from photo and video sales. It’s the easiest money I’ve ever made. I’m walking you through exactly how to do it, even with a small portfolio of HD clips.
You’ll receive a beautiful 20 page PDF filled with valuable content packed full of insider tricks, including
- Top 8 categories and genres of stock
- Growing your portfolio into a money making machine (literally)
- How to find keywords that will quickly rank high in search results so that your photos and video clips sell over and over again

DOWNLOAD NOW: The Ultimate Guide to Selling Stock Bundle
How to Track Your Own Stock Photos
The king of all things online search: Google reigns again.
We’ll be using images.google.com to reverse image search our images. Sadly, there’s no way to batch this process, you’ll have to search your photos one at a time. But it’s fun, right? No biggie.
I have heard others say that you can simply enter the URL here, but it doesn’t work for me. I get this error message: ‘The URL doesn’t refer to an image, or the image is not publicly accessible.’

My guess is that it’s because of restrictions on the image for copyright purposes through the stock site? If anyone has a solution or sees what I’m doing wrong, do tell!
My work around is to simply enter a screenshot (or whatever easily accessible copy you have) of the photo into the browser and click search by image. Just hover your mouse over the little camera icon and you’ll see it. Click on the camera and you’ll see this window.

Upload your image there and google will automatically begin searching for your image.
Once this happens, scroll down to the bottom of the page where it says: ‘Pages that include matching images’. If you see your photo next to these pages, then you’re on your way. Go ahead and click through to see your image in action.

FINDING SOME OF MY TOP PHOTOS ONLINE
Now for the fun part! Want to see where some of my top sellers are hanging out online? Here we go…
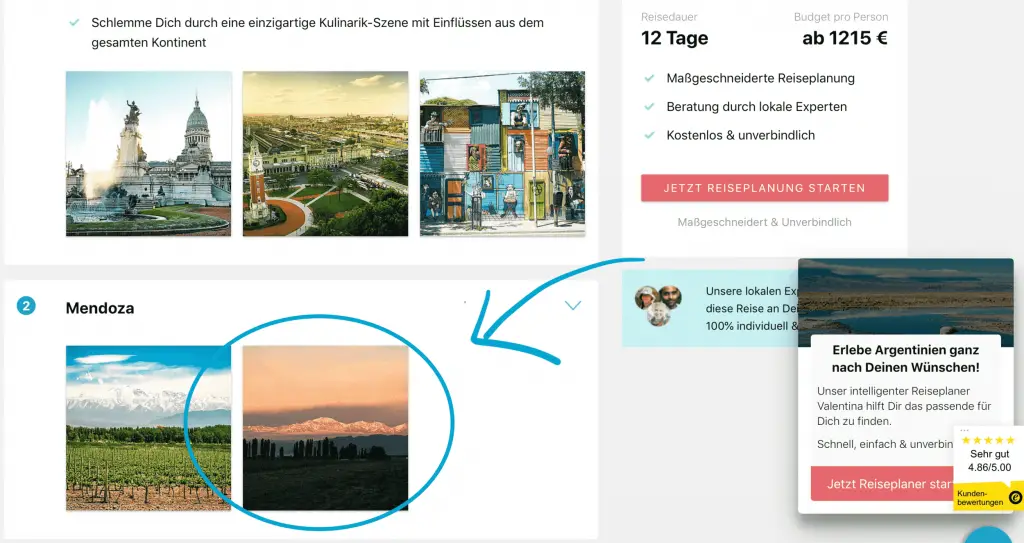
1. Andes Mountain range at sunrise in Mendoza, Argentina. Found on a German page about travel called wedesigntrips.com
2. Baby Doing Tummy Time. Found on romper.com, an article about babies holding their head up.

Also found on twitter, pictured below.

And again, found on an article at medium.com.

3. NICU bassinet. Found on multiple sites, including mostly news articles and a few blogs.


4. Close Up Shot of Low Country Boil. Found on a site about great camping foods.
Side note: I’ve searched for this one before and seen it on a few online menus at various restaurants. I wanted to call them out – false advertising, amiright?!

5. Baby Throwing Clothes Out of Dresser. Found on a few lifestyle blogs.


Concluding Thoughts
I could do this all day.
If you have some recent sales, give it a shot. Post a link in the comments below to share with me. I’d love to see where your photos are online as well!
One more note: the process isn’t perfect. I’ve done the same photos in the past and received different results. If a certain photo isn’t showing any results either try it again or try another photo and come back to it.
You also won’t be able to find every use of your photo – in these examples I’m using some of my top sellers and still only pulling up a handful of results. Customers who buy your stock photos may be using them elsewhere that you can’t track down – emails, flyers, brochures, billboards, other print advertisements, etc.
As always, please leave me your thoughts and questions in the comments below. I hope you enjoyed seeing some of my own stock photos in real life!
-Beth