Being an editor is not just about skill, it’s also about efficiency.
Knowing the quickest, simplest, most straight forward way to accomplish everyday tasks in your video editing program is crucial.
Sure, you could easily use the traditional copy and paste (command-c / command-v) keyboard shortcuts to duplicate clips in your timeline, but there’s a much quicker way.
And it couldn’t be easier.
Here’s the quickest way to duplicate clips (video, audio, etc.) in your Premiere Pro timeline.
It’s almost too easy. Here we go.
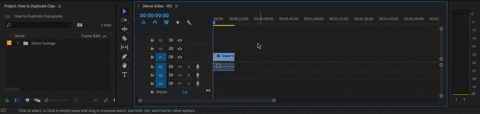
Step 1: Select the clip.
Select the clip that you’d like to duplicate.
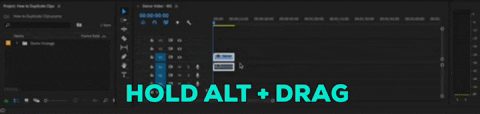
Step 2: Hold Alt + Drag.
Hold down the ‘alt’ key as you drag the clip to the desired location on your timeline.
Step 3: Drop in desired location.
Let go. There you go, a duplicated clip in your desired location.
It doesn’t matter if your clip is audio or video, this will work for either.
It doesn’t matter which track you want to place your clip on, you can drag and drop the newly duplicated clip wherever you’d like by simply holding down the alt key and moving it wherever you wish on your timeline.
For this reason (plus the fact that it’s the quickest) I think this is the best way to duplicate clips. It gives you far more control over where your clip will ‘land’ than copy and paste.
How to Duplicate Text in Premiere Pro
You can duplicate a text clip, an adjustment layer, or a graphic layer in exactly the same way.
Simply hold down the alt button as you select the desired clip and move it to its new location.
Note: the duplicated clips will carry on all the same effects, color treatments, etc.
Once you’ve duplicated the clip, double-click the new clip and change any parameter that you’d like to customize for that clip.
Bonus Tip: Using the Alt Key to Isolate a Track
Not only can the alt key be used to duplicate a clip, you can also hold down the alt key when selecting either a video or audio clip to select just the video portion or just the audio portion.
In many cases your clips will have video and audio synced and when you move one, the other moves as well.
Hold down the alt button, select the desired portion of your clip and drag it to a new location.

You’ve now isolated just that desired portion of the clip without having to unlink the clip from the start.
One More Premiere Pro Trick: Hold Down Alt to Ripple Delete
I couldn’t stop myself.
While we’re on the subject of using the alt key for quick editing shortcuts, I thought I’d mention this huge time saver.
When you simply select a clip and hit delete, you’ll notice that the clip is deleted but there’s a space or gap left in your timeline where the clip used to be.
To fix this you’d need to laboriously select everything that came after that clip and manually slide it to just the right keyframe without over lapping to close that gap.
However…
If you hold down alt when you also hit delete, not only will your clip be deleted, Premiere Pro will close the gap as well.
Everything on your timeline that came after the deleted clip will slide forward so that no gap exists.

If you’d like to explore more great ways to edit using the ripple delete tool, feel free to check out this post I made all about it. It’s a really helpful tool and will speed up your editing flow like nothing else.
Concluding Thoughts
That’s is for today’s quick Premiere Pro tutorial. I hope you found is useful and time-saving.
If you have any further questions, please leave them in the comment section below.
Check out more simple to follow Premiere Pro Tutorials for Beginners on the blog!
Happy editing,
-Beth