I’ll be honest, when I first began editing, keyboard shortcuts felt intimidating.
It seemed like a long list of letters and numbers and combinations to memorize and frankly it was quicker to just do things the way I knew how.
Over the years, slowly but surely I’ve learned more than a handful of keyboard shortcuts. And it’s true, they’ve saved me hours of time.
With a little practice, you’ll know them like the back of your hand.
The key is to start with one or two shortcuts at a time.
Think through which commands you are using most often as you edit and take mental note.
Then take a look at the keyboard shortcuts for those one or two commands and start using them as you edit.
Soon, you’ll find yourself doing this for a few more common commands and before you know it, you’re a faster, more efficient editor.
Let’s walk through how easy it is to set up keyboard shortcuts in Premiere Pro. You have the option to create your own or to use the shortcuts already created within Premiere Pro.
How to Create A New Keyboard Shortcut in Premiere Pro
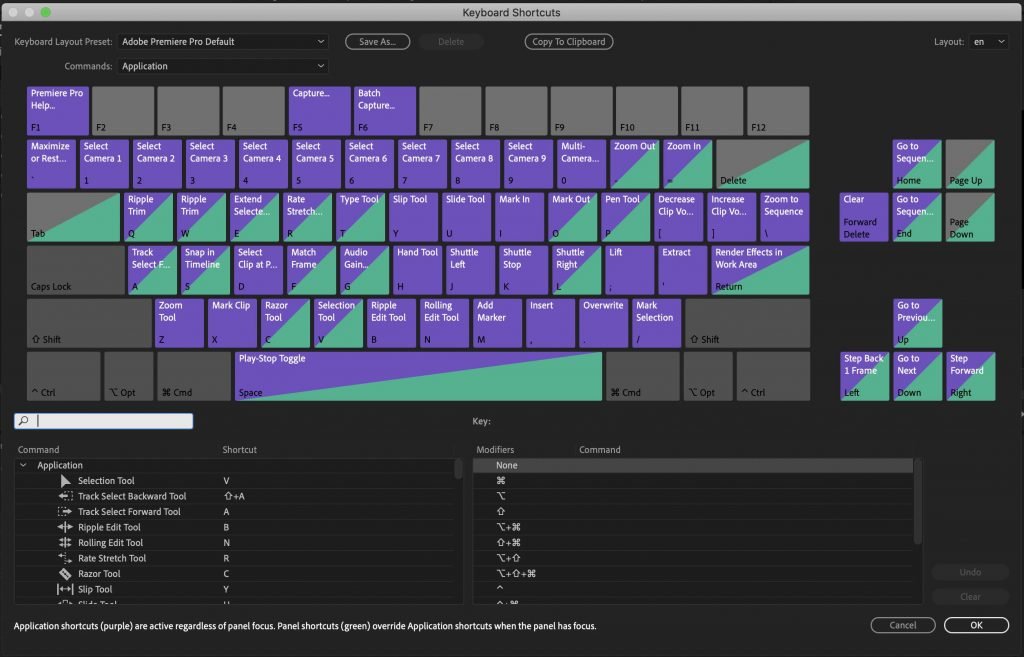
Navigate up to ‘Premiere Pro‘ and click on ‘Keyboard Shortcuts‘.

This will open the main menu where you can see and adjust your existing keyboard shortcuts.
To create a new keyboard shortcut of your choice, you first need to search for the command that you’d like to assign a shortcut to.
In the search box under the left side of the keyboard, begin typing your command.

Let’s use the example, ‘Ripple Delete‘.

Once I start typing my desired command, I see in the window below that ripple delete has already been assigned a shortcut.
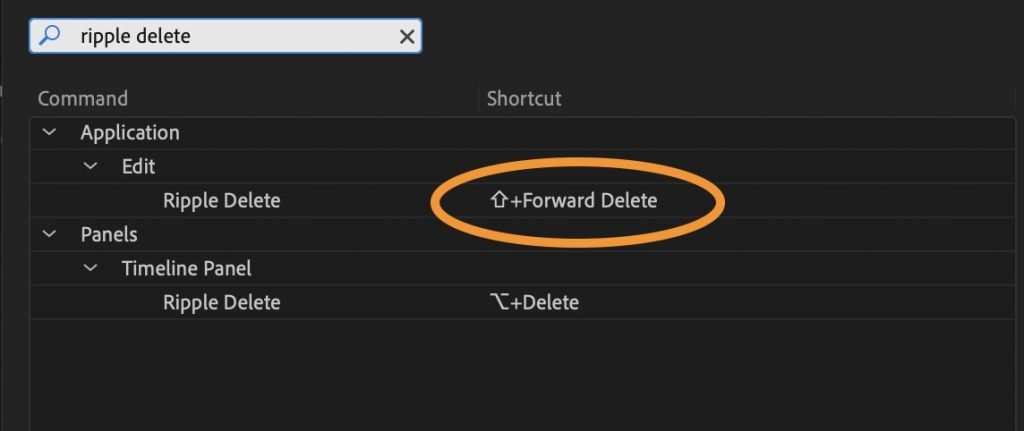
If I want to change this shortcut, I simply hit the little ‘x’ to the right side of the current assigned shortcut.
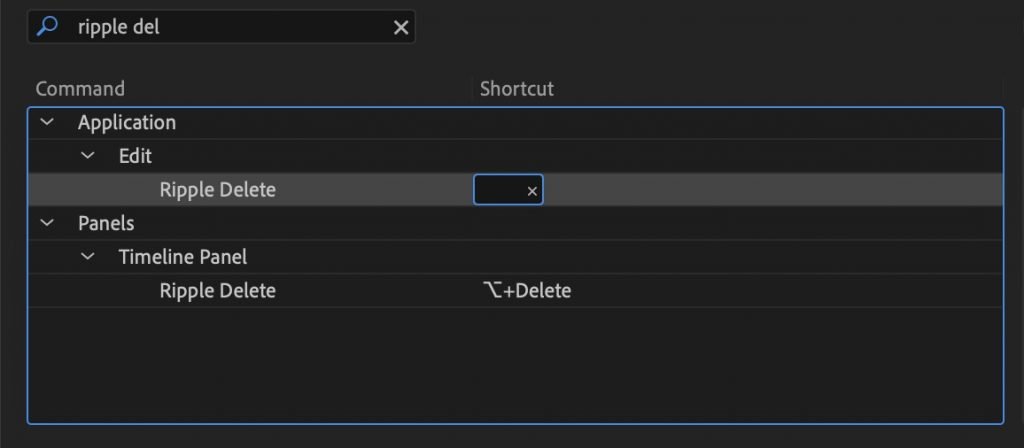
You should now see an empty box. All you need to do is click inside that box and begin typing your new shortcut into the box.
As you begin to type your new shortcut, the visual keyboard on your screen will show you in real time which keys already have shortcuts assigned to them.
If you happen to choose a shortcut that’s already been assigned, then you’ll see this notification at the bottom of your screen.

You can either leave it this way if you know you won’t want to use the other shortcut, or reassign the other shortcut.
How to Add Multiple Keyboard Shortcuts to One Command
Another great benefit is that Premiere Pro allows you to assign more than one shortcut to a command. This can be beneficial if you want to assign shortcuts that work in multiple programs.
For example, if you have one editor that’s used to Final Cut Pro and another that’s used to Premiere Pro, you can assign both keyboard shortcuts to the same function.
Just click next to the current command box and you’ll notice another empty box opens up, allowing you to enter another keyboard shortcut of your choosing.

How to Change Existing Keyboard Shortcuts in Premiere Pro
When you first open the keyboard shortcut window, you’ll notice that the keys are filled with either purple, green, or both.
This means that those keys have already been assigned one or multiple keyboard shortcuts.
What Do the Purple and Green Keys Mean?
The purple keys are ‘application‘ shortcuts and will be the most commonly used commands.
In most cases you can simply pay attention to the purple keyboard shortcuts.
The green keys are secondary ‘panel‘ shortcuts that are used only within certain specific panels. When those panels are open and the keyboard shortcut is used, the green shortcut will override the purple one.
If you hover over the key, you’ll see the main command for purple and the secondary command for green.
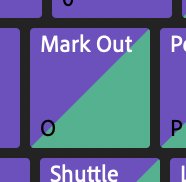
By clicking on any of the keys, let’s take the ‘O’ key for example, I can see the keyboard shortcuts already assigned to it in more detail in the lower right menu key.

Start by looking at the left column under ‘Modifiers‘. This will tell you which key combinations go together to create the different commands on the right.
For example, without any other key selected, hitting the ‘O’ key by itself with either select the Rotation Tool or the Mark Out function.
Which command is executed will depend on which panel is open when you hit the keyboard shortcut.
If I am not in the legacy title panel, then hitting the ‘O’ key will execute the Mark Out function. If I am in the legacy title panel, then hitting the ‘O’ key will select the Rotation Tool.
Moving down the list, if I hold ‘COMMAND O’ together, then there’s a whole different keyboard shortcut command: Open Project.
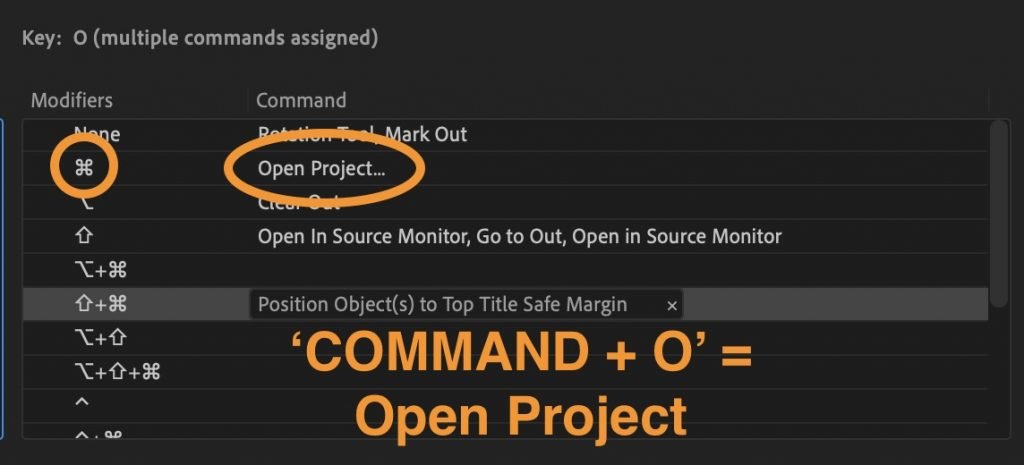
You’ll see all the many combinations of shortcuts and commands as you move down the list.
You can change any of these commands or shortcuts by simply clicking within the box and typing your new command.
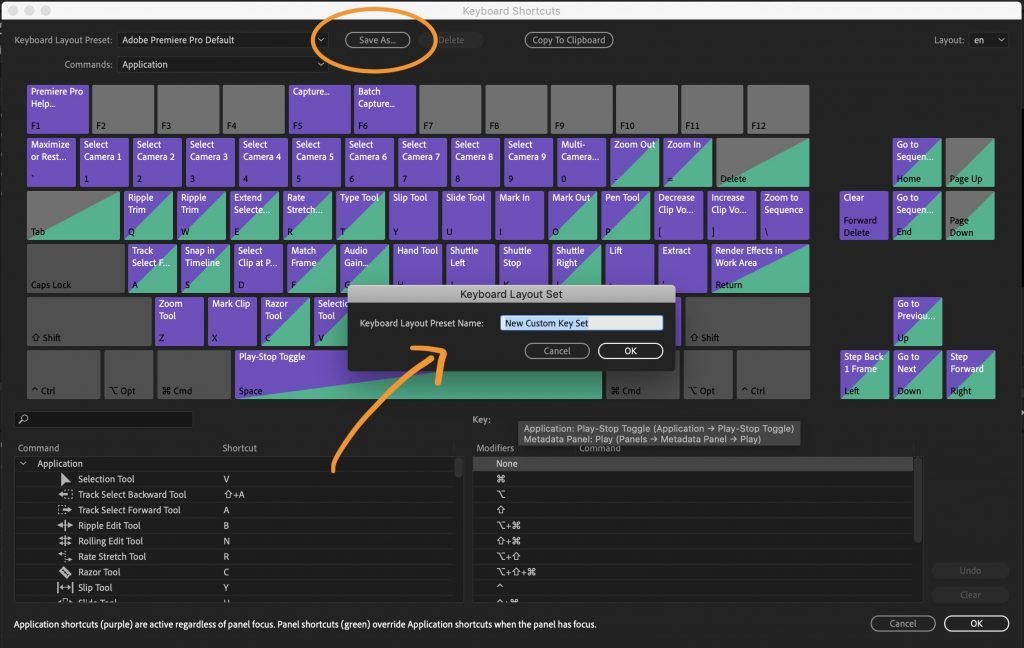
How to Save a Set of Custom Keyboard Shortcuts
If you’ve completely customized your keyboard and would like to save it for future use, simply click the button at the top titled ‘Save As’.
You can now give your custom keyboard a personalized name to use whenever you’d like.
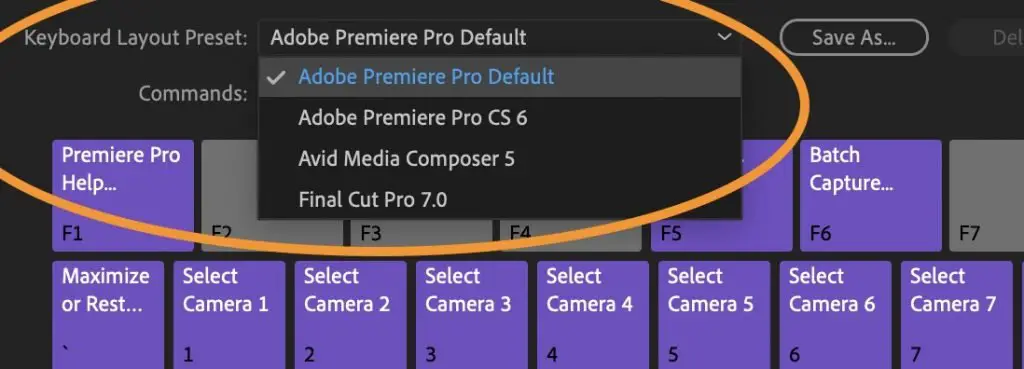
How to Restore the Default Keyboard Shortcuts
Premiere Pro makes it super easy to set reset default keyboard shortcuts for the current version of Premiere Pro, as well as previous versions of Premiere Pro.
They’ve even made it possible to set your default keyboard shortcuts to match the keyboard shortcuts in other editing platforms such as Final Cut Pro and Avid.
This is an excellent help to editors who are used to working on multiple platforms but want to streamline their keyboard shortcuts.
Navigate to ‘Premiere Pro‘ -> ‘Keyboard Shortcuts‘ to open up the main keyboard shortcuts menu.
In the top left corner, you’ll see a drop down menu ‘Keyboard Layout Preset‘. Here you can select among the default keyboard shortcuts.
How to Import and Export Keyboard Shortcuts in Premiere Pro
In most cases, by simply logging in to the Creative Cloud, you’ll be able to access your custom keyboard on any device. However, if you need to copy the file manually, here’s how to do so.
First, you’ll need to save your preset by hitting ‘Save As’ in the top menu and assigning your keyboard a unique name.

Go to the following path, and you’ll see the new keyboard file (.kys) under the keyboard layout set name you selected.
For Mac Users:
[username] / Documents / Adobe / Premiere Pro /
9.0 / Profile – CreativeCloud – / Mac
For PC Users:
C : \ Users \ USERNAME \ Documents \
Adobe \ Premiere Pro \ [Premiere
Copy the .kys file and transfer it to the same location above on your new computer.
Once copied, open Keyboard Shortcuts in Premiere Pro and choose the new layout from the Layout dropdown and hit the OK button.
Concluding Thoughts
That’s just about everything there is to know about using and setting up keyboard shortcuts in Premiere Pro.
Let me know in the comments below what your favorite and most useful keyboard shortcuts are.
My personal favorites are Mark In (i), Mark Out (o), and ripple delete (I have mine customized to x).
You can read more about exactly how I use some of these keyboard shortcuts to save time editing in this blog post.
Happy Editing!
-Beth